You have a WordPress site that works but you have the impression that it is a little slow? You have searched for information on the web but you don’t know where to start? Don’t panic! Don’t panic! In this guide you will find all the information you need to optimize the speed of your WordPress site.
Note: Most of the information and advice below is applicable to any site and is not specific to WordPress.
- Why having a fast website is important ?
- Understand the process of an http request
- Web tools to test the speed of your wordpress site
- the influence of the php version
- Caching
- Gzip compression
- html, css and javascript file minification
- Http1.1 VS http2 and the request number
- Reduce external ressources
- HTML, CSS and JS complexity
- Images
- Server location
- Useful ressources to speed up your wordpress site
Why is having a fast website so important?
- For the user experience: There are many different statistics on the net (and it is difficult to know if these statistics are good) but overall, if your page takes more than 3 seconds to load (mobile or desktop), you will already lose some of the users who will not wait until the page is loaded. A person who has had a bad experience on a site will not want to come back to it either…logical no?
- For SEO: What is important for users is also important for google! The loading speed is an important factor in the great equation of SEO. Important how???? (the 1000 bucks question) I would say that what matters most in SEO is first of all to create quality content that is appealing and answers questions that Internet users ask themselves… the optimization of loading speed (like many other points) comes next. By the way, if you’re interested, we’ve written a super complete guide on SEO and organic search engine optimization.
Read our extensive SEO Guide - To take care of your website: Because your website is ultimately the only thing that belongs to you and that you control on the web (unlike social networks, google and so on, which can change their rules at any time)… so it is extremely important that you take care of it!
How does and http request works: explanations
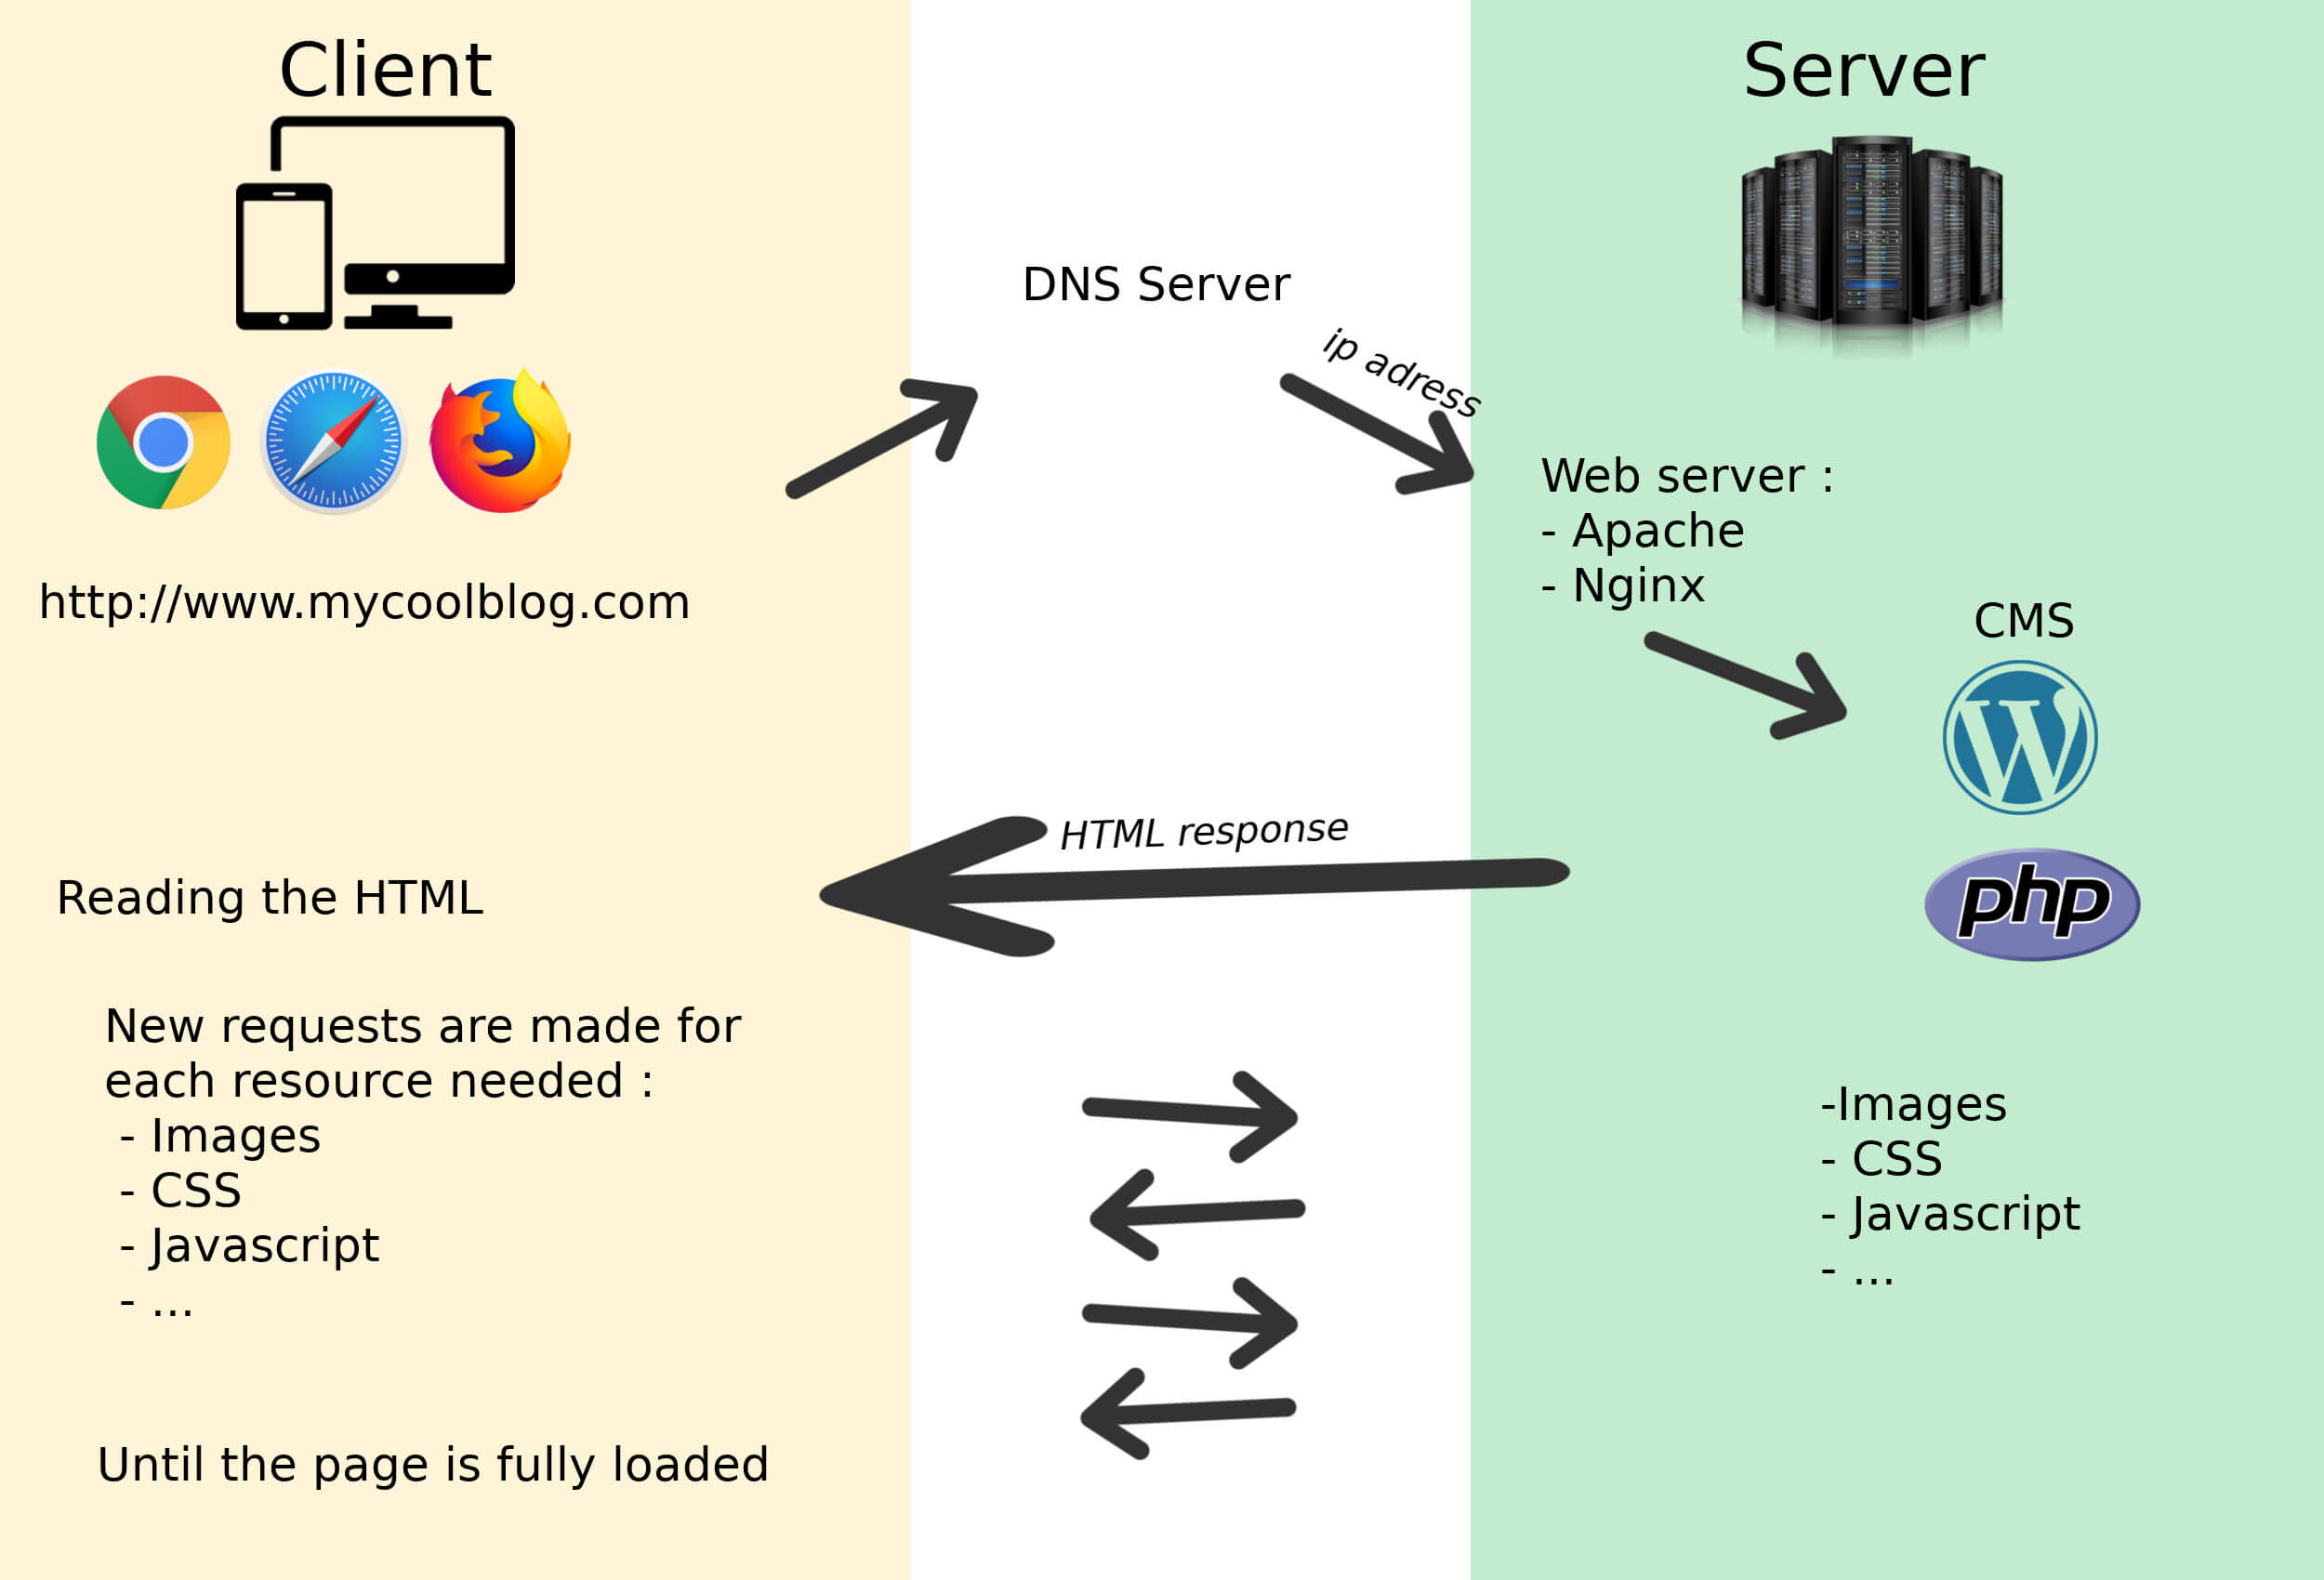
- A user types a url in his browser or clicks on a link.
- He gets the ip address of the server linked to the requested domain name.
- A connection is opened between the user’s computer and the Server and the http request is sent to the server.
- The http request is analyzed by the web server (a software that analyzes the http requests and returns the requested content to the user)… be careful not to mix up the physical web server (a computer connected to the Internet and containing the files necessary for displaying the website) and the web server software.
- For dynamic websites (which is the case for most of the sites nowadays), the request is transmitted for example to WordPress (which is a CMS written in php) which has the role of building the HTML of the requested page/url (i.e. it will take the html of the header, take the html of the article content in the database, add comments if there are any, add the footer etc…).
- Once completed, the HTML is sent to the user’s browser which will analyze it line by line.
- The browser builds the page and makes new requests to the server for each file needed to create the page (css files, javascript, images, fonts etc.). It is a kind of digital ping pong game between the browser and the web server.
- Each time the user clicks on a link or enters a url in his browser, the same procedure is repeated.
It is VERY important to understand the process of an http request because there are several parts of this cycle where you can act to optimize the loading speed.
Useful tools to test the loading speed of your site
Before detailing step by step how you can optimize the loading speed of your site, I will first tell you about the 4 most popular tools to test the performance of your site which are:
- Pingdom
- Google page speed or lighthouse (is also integrated in Chrome. All you have to do is right-click, inspect and audit… the interface is more complete in the browser than on the website)
- Webpagetest
- GTmetrix

Comparison of pingdom, google lighthouse, webpagetest and gtmetrix
But if you have already used these tools to test your website, you will probably have noticed that they do not necessarily give you the same results. That’s because you need to understand how these tools work and what they test exactly to understand their results. Here are the different criteria to be taken into account (if everything is not yet clear it is not important, we will come back to some of these criteria in more detail below):
- Server location: If the server of your website is located in France, you must perform the test with a server that is as close as possible to France to obtain the loading times that are as close to reality as possible
- Speed measures :
- On Load :When most of the elements of a page are loaded, the browser triggers the windows.onload event. The problem with this measure is that this event is used by some scripts, plugins or other to add elements to a page. As a result, this measurement is not necessarily representative of the actual loading time
- Fully Loaded : This is the time after which the windows.onload event was triggered and that there is any network activity left. This measure is therefore more consistent for testing purposes.
- Core Web Vitals: The Core Web Vitals are 3 new metrics of the user experience on your site that measure currently the loading speed, the visual stability and the interactivity of your site for your visitors. The Core Web Vitals (LCP, CLS, FID) are the new benchmark metrics for Google and are therefore important.
- http1 vs http2 : We will discuss this further below but http2 is the new standard in terms of http protocol and a good testing tool should use http2 when possible.
- Connection type : A good testing tool allows you to choose different internet connection speeds so that you can see how your site behaves according to the type of connection.
- Screen resolution :Here too, it is important to know the screen dimensions of the test and even better if you can choose different types of resolutions (large screens, small screens, mobile).
- Browser : Does the tool use a real instance of a browser (chrome, firefox, safari) or not (an emulated browser)? Can I choose different types of browsers for the test?
| criteria | Pingdom | Google lighthouse | gtmetrix | webpagetest |
|---|---|---|---|---|
| Server location | 7 locations | browser location | 7 locations | 38 locations |
| Speed measure | On load | Core Web Vitals (+ others) | Core Web Vitals (+ others) | Core Web Vitals (+ others) |
| Http1 vs http2 test | http1 | http2 | http2 | http2 |
| connection type | ??? | several choices | several choices | several choices |
| screen resolution of the test | 1024×768 | several choices | several choices | several choices |
| Browser | Chrome (old) | Chrome | several choices | several choices |
By comparing according to these different criteria, we can see that GTmetrix, WebPageTest and google lighthouse (integrated in the chrome browser) are more advanced and up to date tools than Pingdom
Important metrics
Here are the metrics given by these tools that I consider the most important:
- Core Web Vitals: Since Google decided to integrate these metrics into its algorithm (2021), these are the new benchmark measures for user experience and website loading speed. The ideal is therefore to be in green for the 3 Core Web Vitals scores.
Read our guide to improve Core Web Vitals on your WP site - Speed Index : Indicator of the speed at which the visible part of the page loads. I would say that if you are below 2000 it is already not too bad.
- TTFB (time to first byte) : Measures the time between the time your browser makes the 1st http request and the arrival of the response. Good indicator of the speed of your server and the speed at which WordPress generates the html of the page.
And here are the indicators that I don’t think are that important:
- The scores: There is no need to have 100/100 on the google page speed to have a fast site
- The recommendations: Some of these recommendations are no longer up to date (especially since the arrival of http2, all recommendations to reduce the number of requests are no longer valid. More details on this matter below).
- The different loading times: On Load, fully loaded… it is better to focus on the loading speed of the above the fold elements of the page.
Which version of php do you use?
![]()
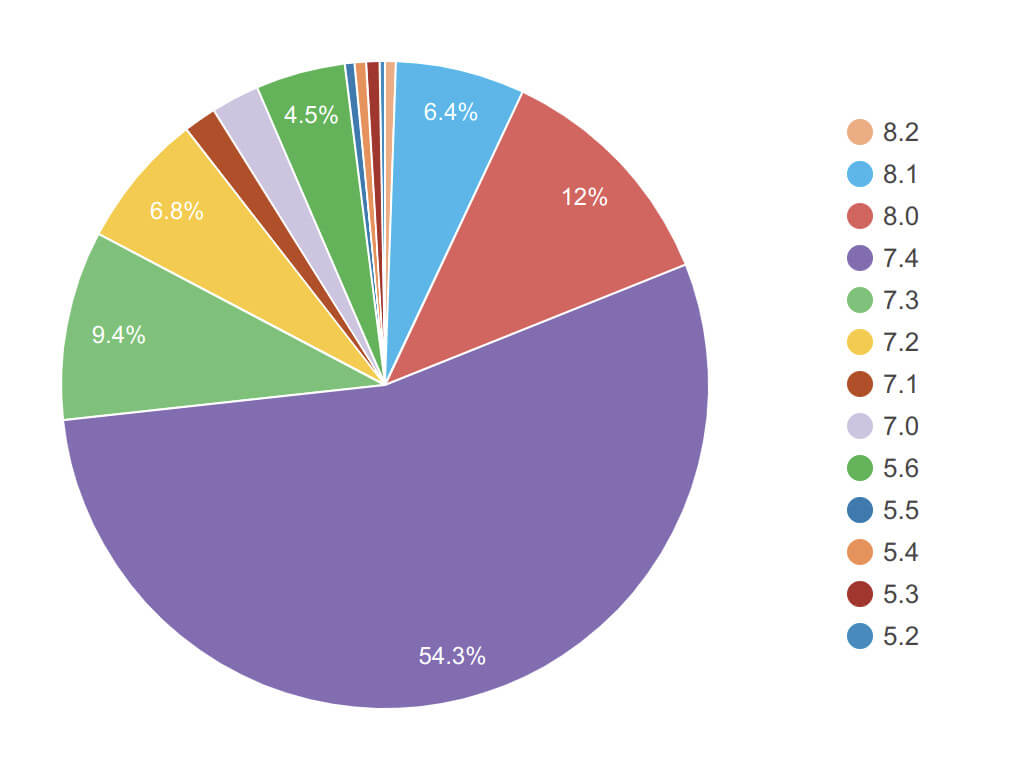
![]() If you use WordPress, you use the programming language php… and even if you don’t use wordpress, chances are you will use php too because 80% of all websites use this language. Depending on the version of php that is installed on your server, your site will not have the same performance (php versions used by wp sites).
If you use WordPress, you use the programming language php… and even if you don’t use wordpress, chances are you will use php too because 80% of all websites use this language. Depending on the version of php that is installed on your server, your site will not have the same performance (php versions used by wp sites).
In 2023, versions 8.2 (0.5%), 8.1 (6.4%) and 8.0 (12%) of php are still supported. This also means that more than 80% of all WordPress sites are running older versions of php that are no longer supported and that could have security and performance problems (in 2023 this is somewhat WordPress’ own fault as they are still in beta for php 8.0…). There are even more than 5% of sites that are still running versions <= PHP 5.6…
 But to show you how the version of php installed on your server can affect the loading speed of your site, I decided to do a little homemade test (instead of showing you some numbers found on the internet). I installed a copy of our travel blog on a development server, being careful not to have active caching (to make sure I received the html created by wordpress and php and not a cached version of the page) or any other optimization. Then I tested the loading speed of the site with pingdom by changing only the version of php (5.6, 7.0, 7.1 and 7.2) installed on the test server. Here is the result:
Note: This test is a bit old but the idea remains the same 😉 . I may do a test with more recent versions of PHP in the future

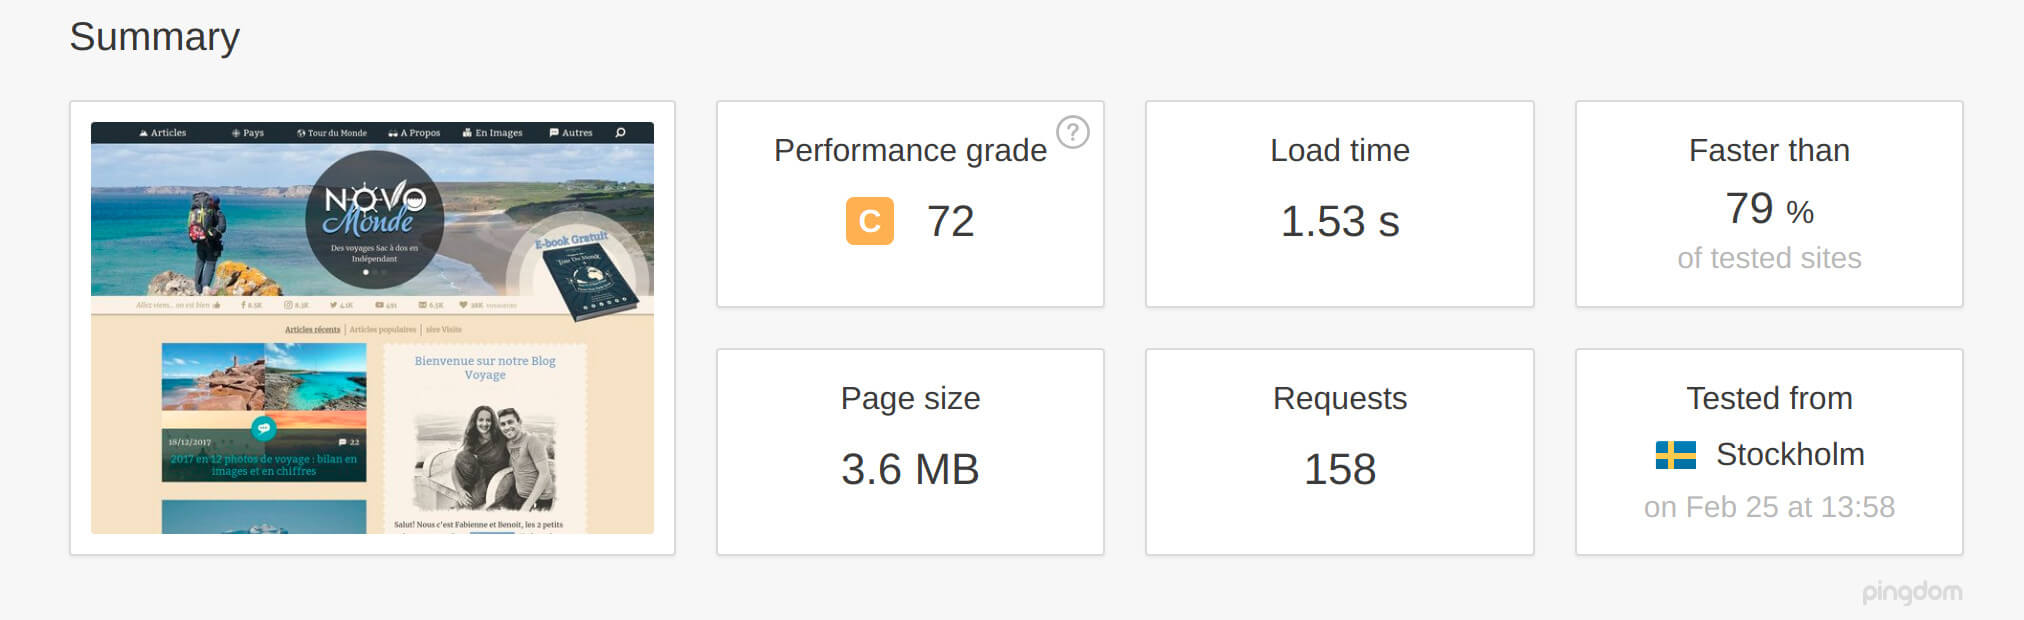
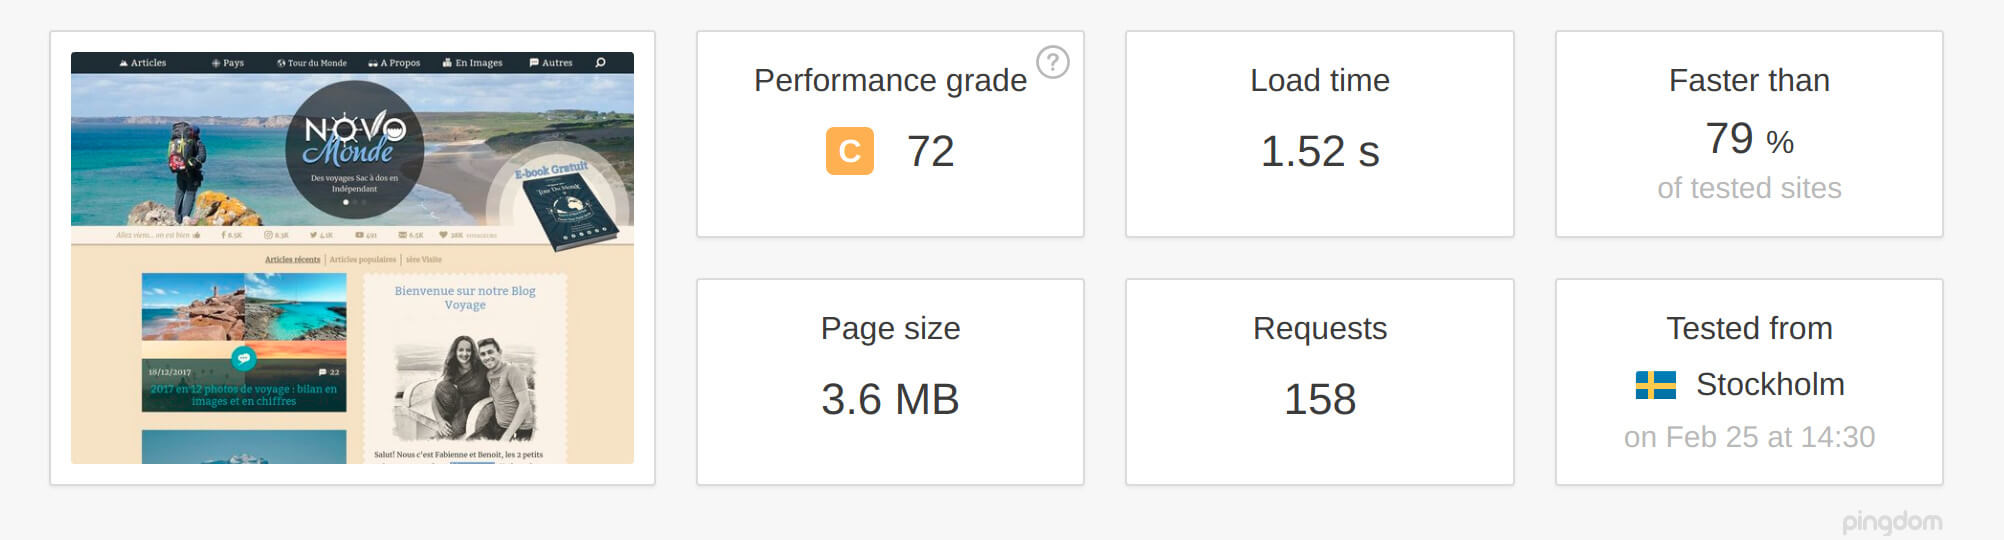
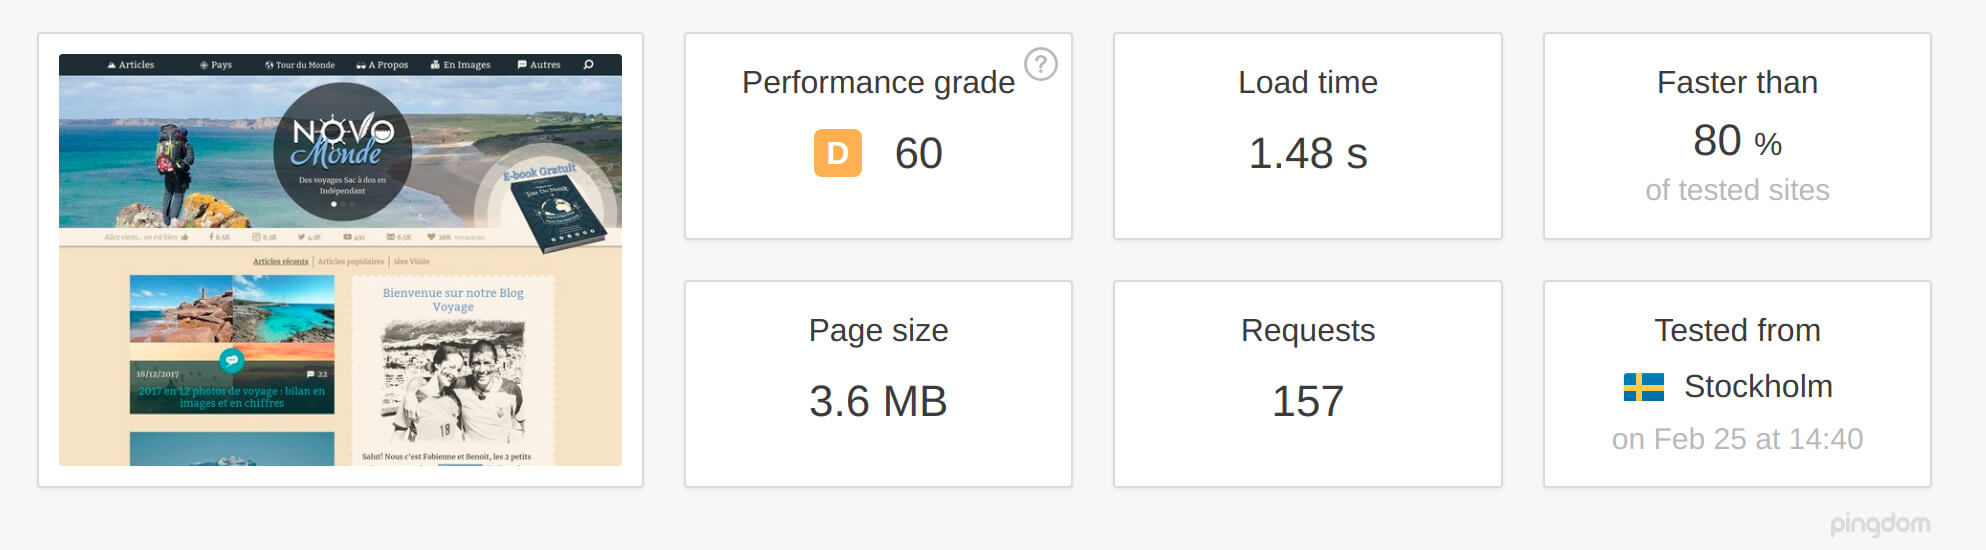
| php 5.6 | php 7.0 | php 7.1 | php 7.2 | |
|---|---|---|---|---|
| Result | 2 sec | 1.53 sec | 1.52 sec | 1.48 sec |
We can see that there is a big difference in performance between php 5.6 and php 7+ and that the 1st request was returned much faster (almost 25% faster).
Moreover, this quick test does not try to load the site with many visitors at once because in this respect also the versions of php 7+ are much more powerful! (i.e. php 7+ can handle many more requests/sec)
Note 1: Be careful with the compatibility of some plugins with the new version of php (especially php 8.0 +)
Note 2: for the next tests, I used php version 7.0 on the test server… even if this version is a little dated, it has no influence on the conclusions of these tests
Caching
page caching

The process of generating the HTML of the page during the 1st request takes time (even with the latest version of php and a well optimized theme etc). But since the content of the pages rarely changes in the end (each time an article is updated or when there is a new comment for example), it would be much more efficient to create 1 version of the html for each page of the site and to return the html directly without asking wordpress and php to generate this html each time (which is often the same).
This is called page caching. A version of the html of each page is created to avoid asking wordpress to generate these pages dynamically each time. These html versions are only updated when an article is updated or a comment is published or every time interval…
There are several plugins that can help you set up this system. Personally I will recommend the w3 total cache plugin which works well with apache and nginx and which allows you to set up this type of cache but also all the others I will talk about below (and which is free).
Again, instead of showing you the numbers found on the web, I will show you the result of a loading speed test with pingdom of an article on our test site, before and after activating the page caching with w3 total cache :
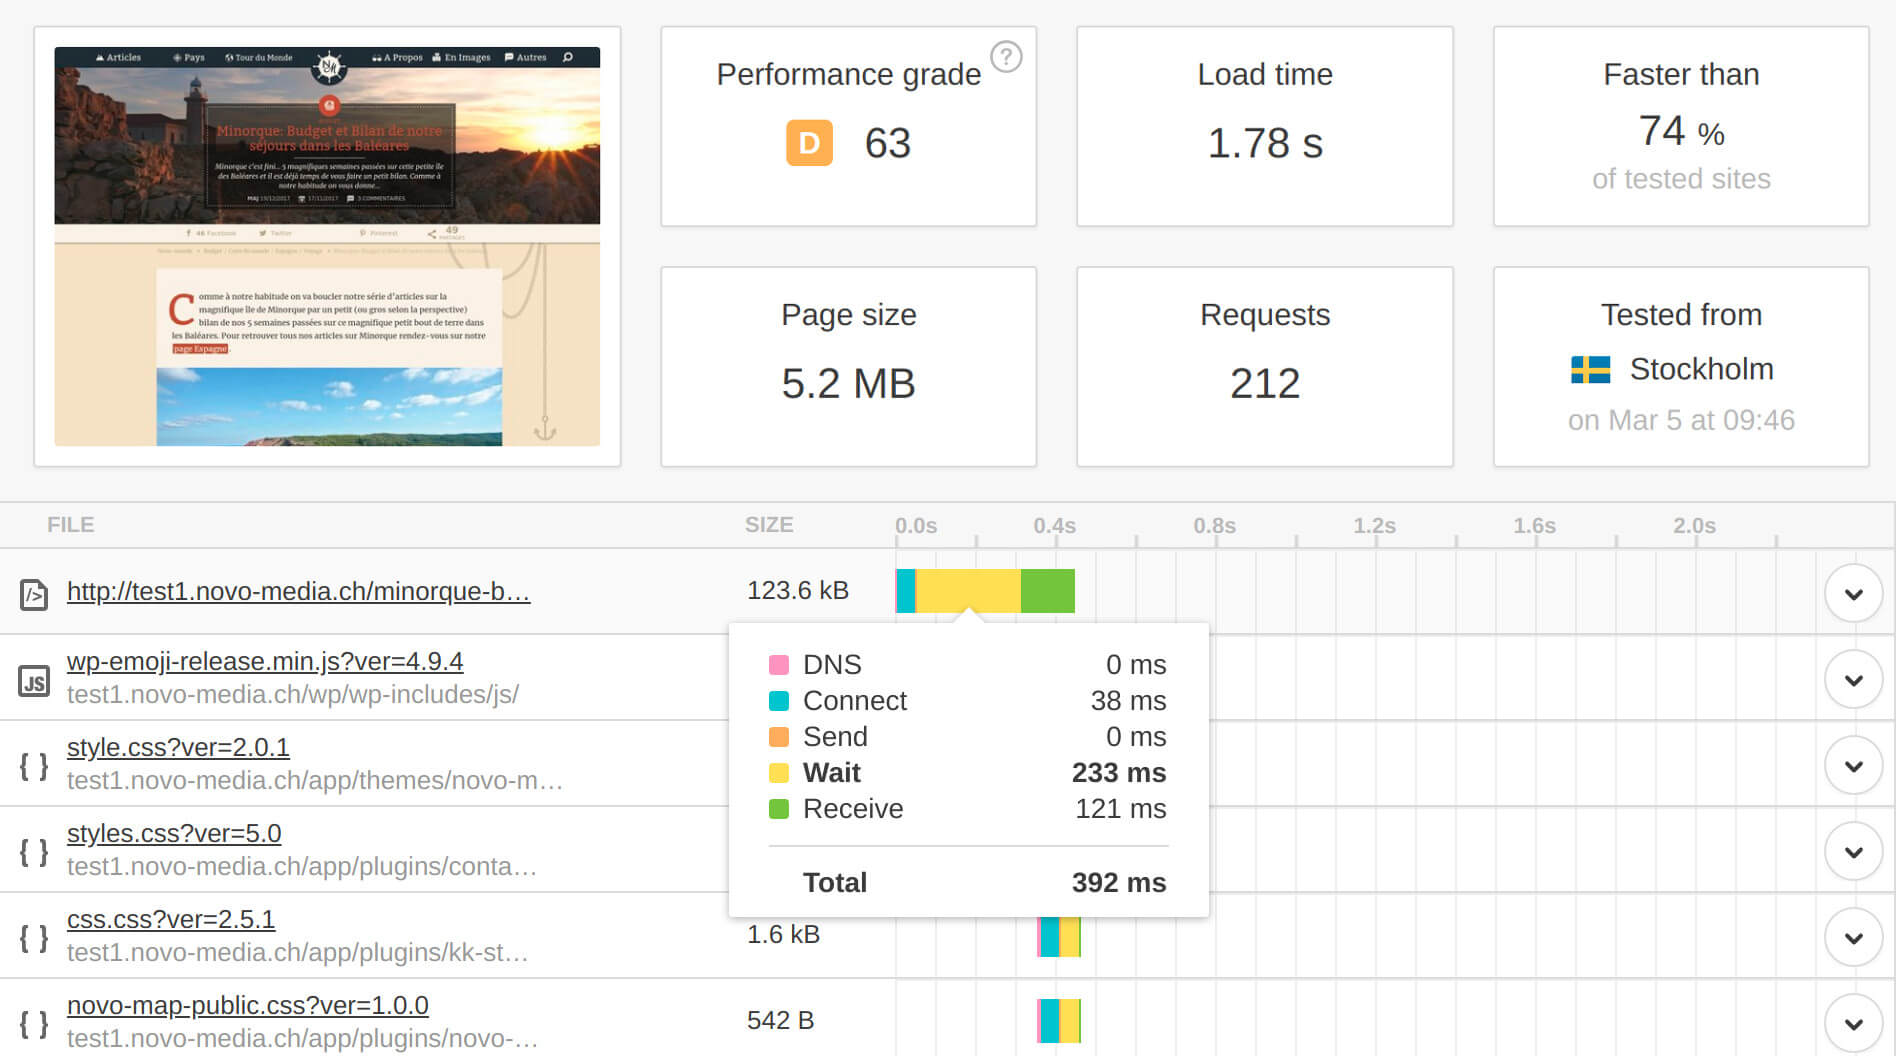
Conclusion : If you see that your 1st request is slow (> 0.2-0.5 sec), the easiest way to make it faster is to enable page caching (regardless of the php version, the quality of your theme etc…). But be careful, setting up a caching solution (such as w3 total cache for example) is not necessarily easy and poorly configured, you could end up with pages cached too long and no longer updated when you modify your articles.
Otherwise you can also try the excellent WpRocket plugin which is easier to configure but which is not free.
Browser caching
It is faster to obtain a file from your hard disk than by downloading it from a server through an internet connection. It is based on this principle that developers have created the browser caching system. The cache is simply a space on your hard drive used by your browser to store the images or files that were needed to display a web page (for example, the logo of your site that is used on all your pages).
But to use the browser cache, you must again add information in your web server configuration (using a plugin like w3 total cache, wprocket or by modifying your web server configuration file) to help the browser to know what type of files it should save in the cache and especially how long. In general, you would like the browser to store:
- files such as images, media, css, javascript… quite long (1 year for example) because in general they do not change too much with time.
- The html of the pages shorter (1h to 1 day) because there are more often changes and it would still be silly if your visitors see for example a version of your homepage from 6 months ago.
This way, when a visitor comes to your site for the first time, he will download all the files necessary to display the page from the server. However, when it continues to browse your site, all the files it has already used will have been cached on your hard drive and will be taken directly from the browser’s cache if necessary (such as your logo for example). As a result, navigation will be faster and more fluid because not all files will be downloaded from the server.
P.S. the browser cache is limited in size and the files that are used less often are replaced by new ones as they are used.
Gzip compression (or Brotli compression)
Gzip compression is a standard technique that allows your web server to compress files before sending them to the browser. You can easily test on this site if you already use gzip compression. To activate it, simply add a few lines in your web server configuration (apache, nginx…) or use a plugin like w3 total cache to do it for you.
As I said, you can simply use a plugin like w3 total cache to enable gzip compression. If you are using the apache web server, you can add these few lines to your.htaccess file:
<IfModule mod_deflate.c>
  # Compress HTML, CSS, JavaScript, Text, XML and fonts
  AddOutputFilterByType DEFLATE application/javascript
  AddOutputFilterByType DEFLATE application/rss+xml
  AddOutputFilterByType DEFLATE application/vnd.ms-fontobject
  AddOutputFilterByType DEFLATE application/x-font
  AddOutputFilterByType DEFLATE application/x-font-opentype
  AddOutputFilterByType DEFLATE application/x-font-otf
  AddOutputFilterByType DEFLATE application/x-font-truetype
  AddOutputFilterByType DEFLATE application/x-font-ttf
  AddOutputFilterByType DEFLATE application/x-javascript
  AddOutputFilterByType DEFLATE application/xhtml+xml
  AddOutputFilterByType DEFLATE application/xml
  AddOutputFilterByType DEFLATE font/opentype
  AddOutputFilterByType DEFLATE font/otf
  AddOutputFilterByType DEFLATE font/ttf
  AddOutputFilterByType DEFLATE image/svg+xml
  AddOutputFilterByType DEFLATE image/x-icon
  AddOutputFilterByType DEFLATE text/css
  AddOutputFilterByType DEFLATE text/html
  AddOutputFilterByType DEFLATE text/javascript
  AddOutputFilterByType DEFLATE text/plain
  AddOutputFilterByType DEFLATE text/xml

  # Remove browser bugs (only needed for really old browsers)
  BrowserMatch ^Mozilla/4 gzip-only-text/html
  BrowserMatch ^Mozilla/4\.0[678] no-gzip
  BrowserMatch \bMSIE !no-gzip !gzip-only-text/html
  Header append Vary User-Agent
</IfModule>
If you use the nginx web server, you can also add these few lines to your configuration file:
gzip on;
gzip_disable "MSIE [1-6]\.(?!.*SV1)";
gzip_vary on;
gzip_types text/plain text/css text/javascript image/svg+xml image/x-icon application/javascript application/x-javascript;
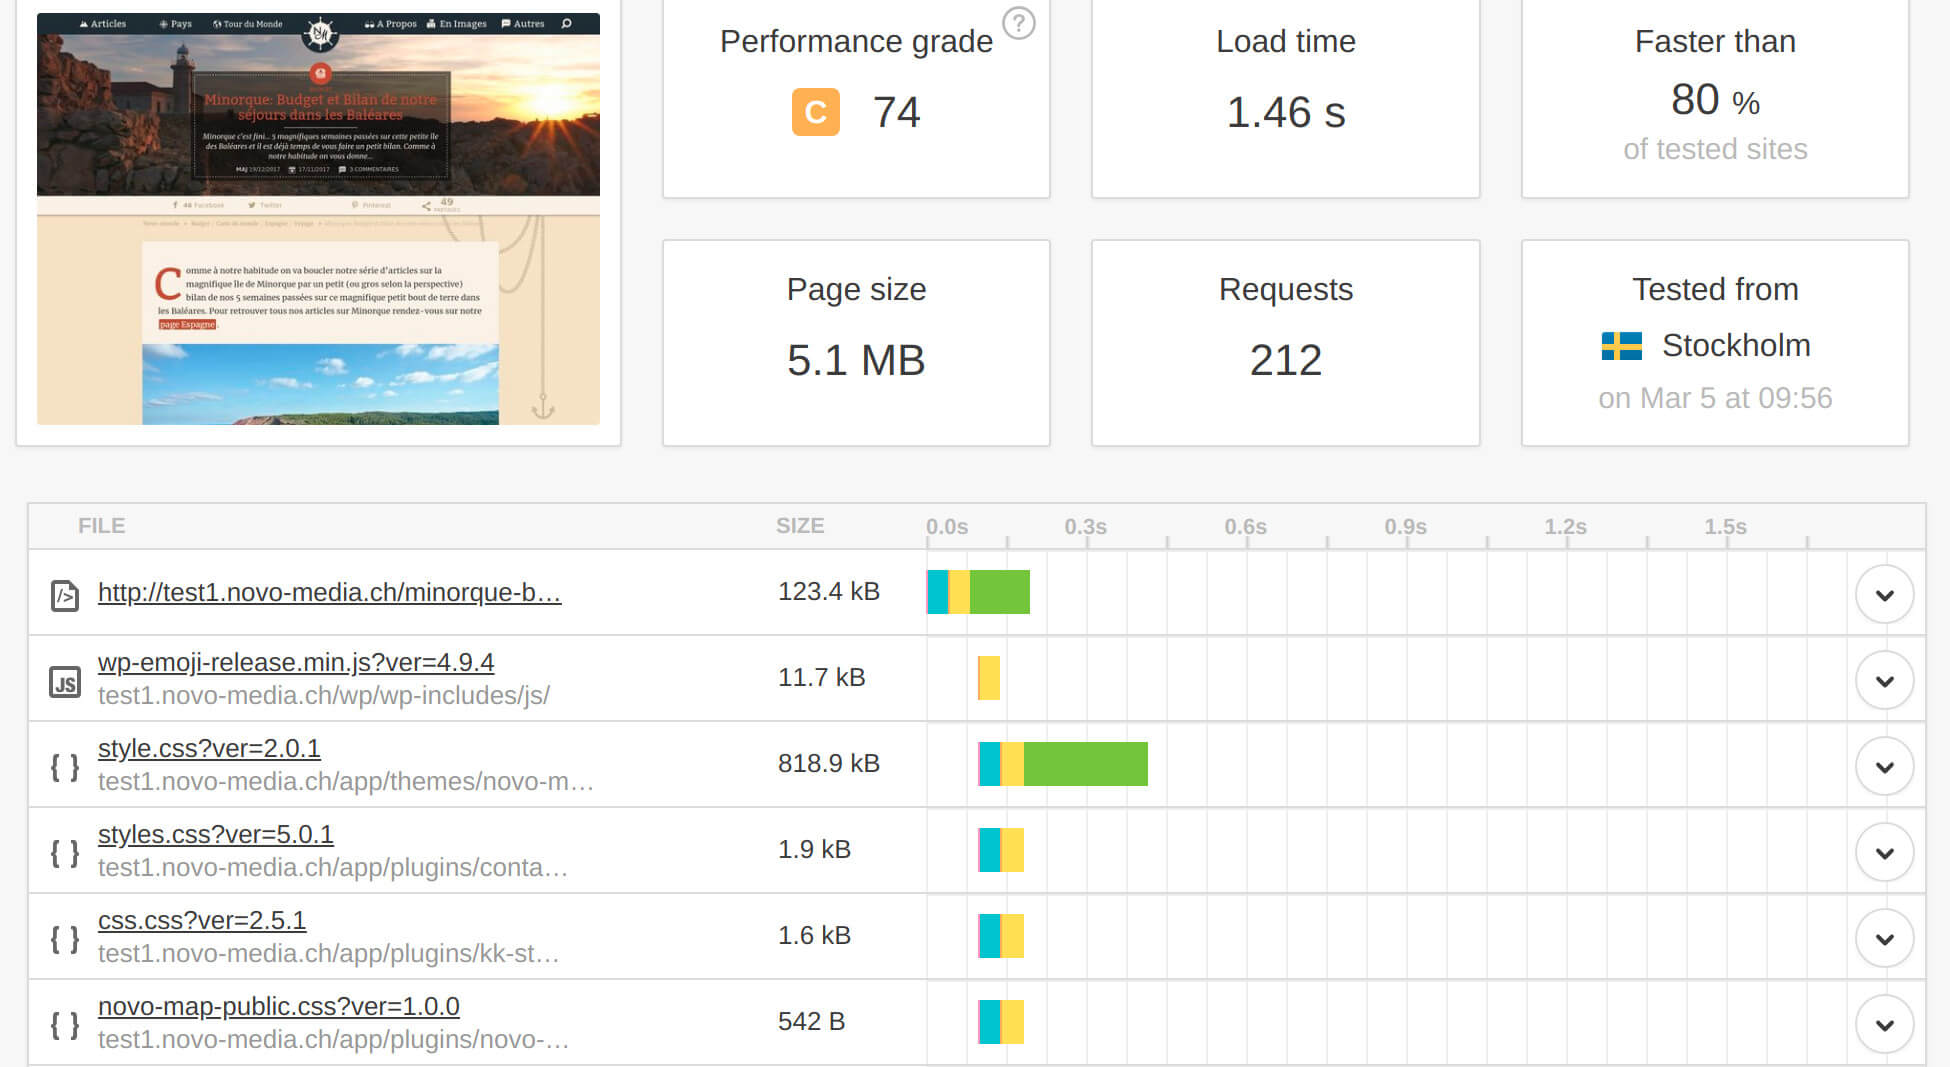
This has the effect of greatly reducing the size of text files such as css and javascript… in this case, the size of the same test page as above has increased from 5.2MB to 3.5MB just by enabling gzip compression:
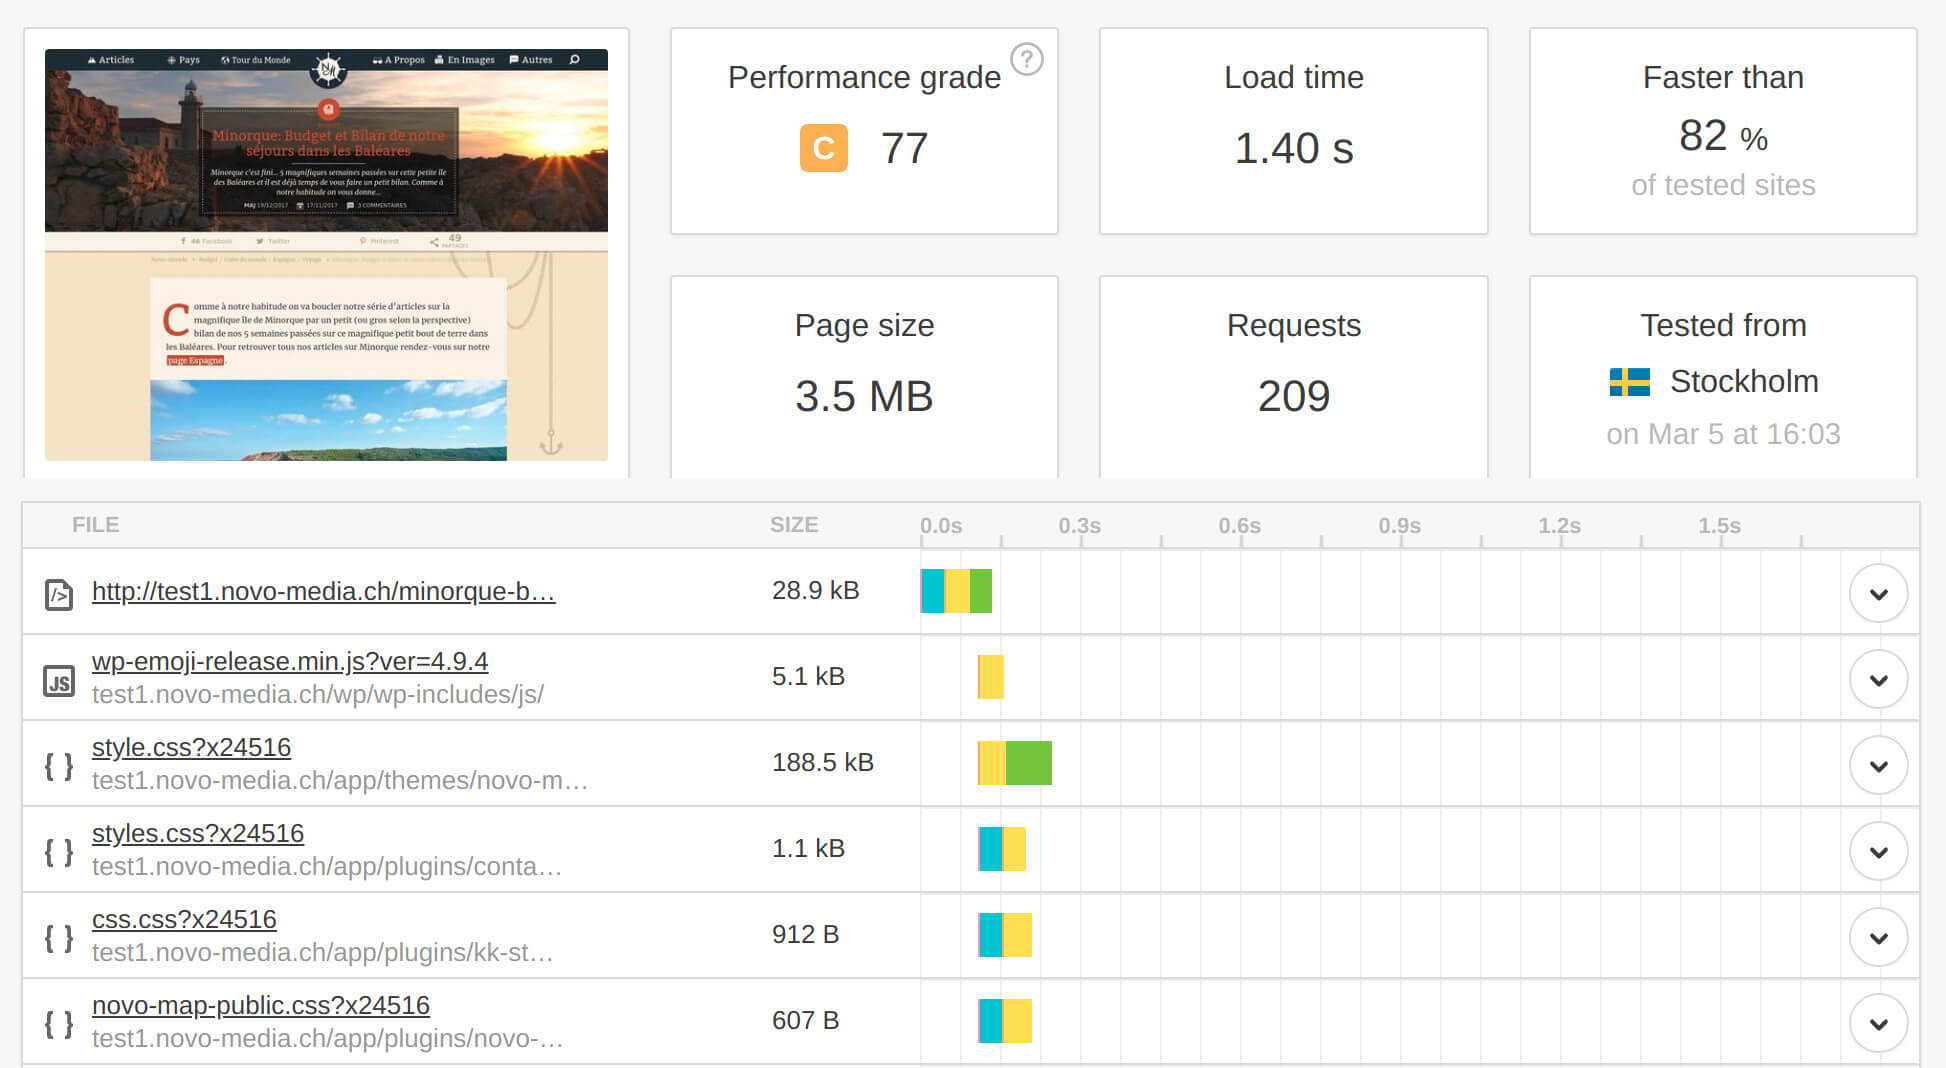
Conclusion : Gzip compression is a web standard and should be enabled on any site. If it is not yet active on your site, do it as soon as possible (even better if you can activate Brotli).
Minify html, css and javascript files
In html, css or js files of your theme or the plugins you use, there is often information that is not necessary for their proper functioning (such as comments, spaces, empty lines etc…). They should therefore be minimized to make them as light as possible without changing their functionality. Most cache plugins like w3totalcache and wprocket allow you to minimize and combine these files. But as you will see in the next point, combining files to reduce the number of requests is no longer necessary with http2.
Conclusion : Before using a plugin, I advise you to analyze your download cascades to see if you really need to minify files (usually quality themes and plugins already load minified versions of html, js and css). If so, try the plugins mentioned above to minimize these files. But be careful, this operation is delicate and could break your site or some plugins. And as you will see in the next section, combining these files is no longer necessary if you have http2
Http1.1 VS http2 : the implications on the number of requests
If you have already been interested in optimizing the loading speed of a site, you have probably already read that you should reduce your number of requests and many rather creative techniques have become standards over time (combining scripts and css, css sprites…). This is because with http1.1, a browser could only have up to 6-8 simultaneous connections with the server and each connection could only handle one request at a time… this system is quite inefficient because without going into details, each connection can potentially block the loading of the page and the process of creating a connection takes time.
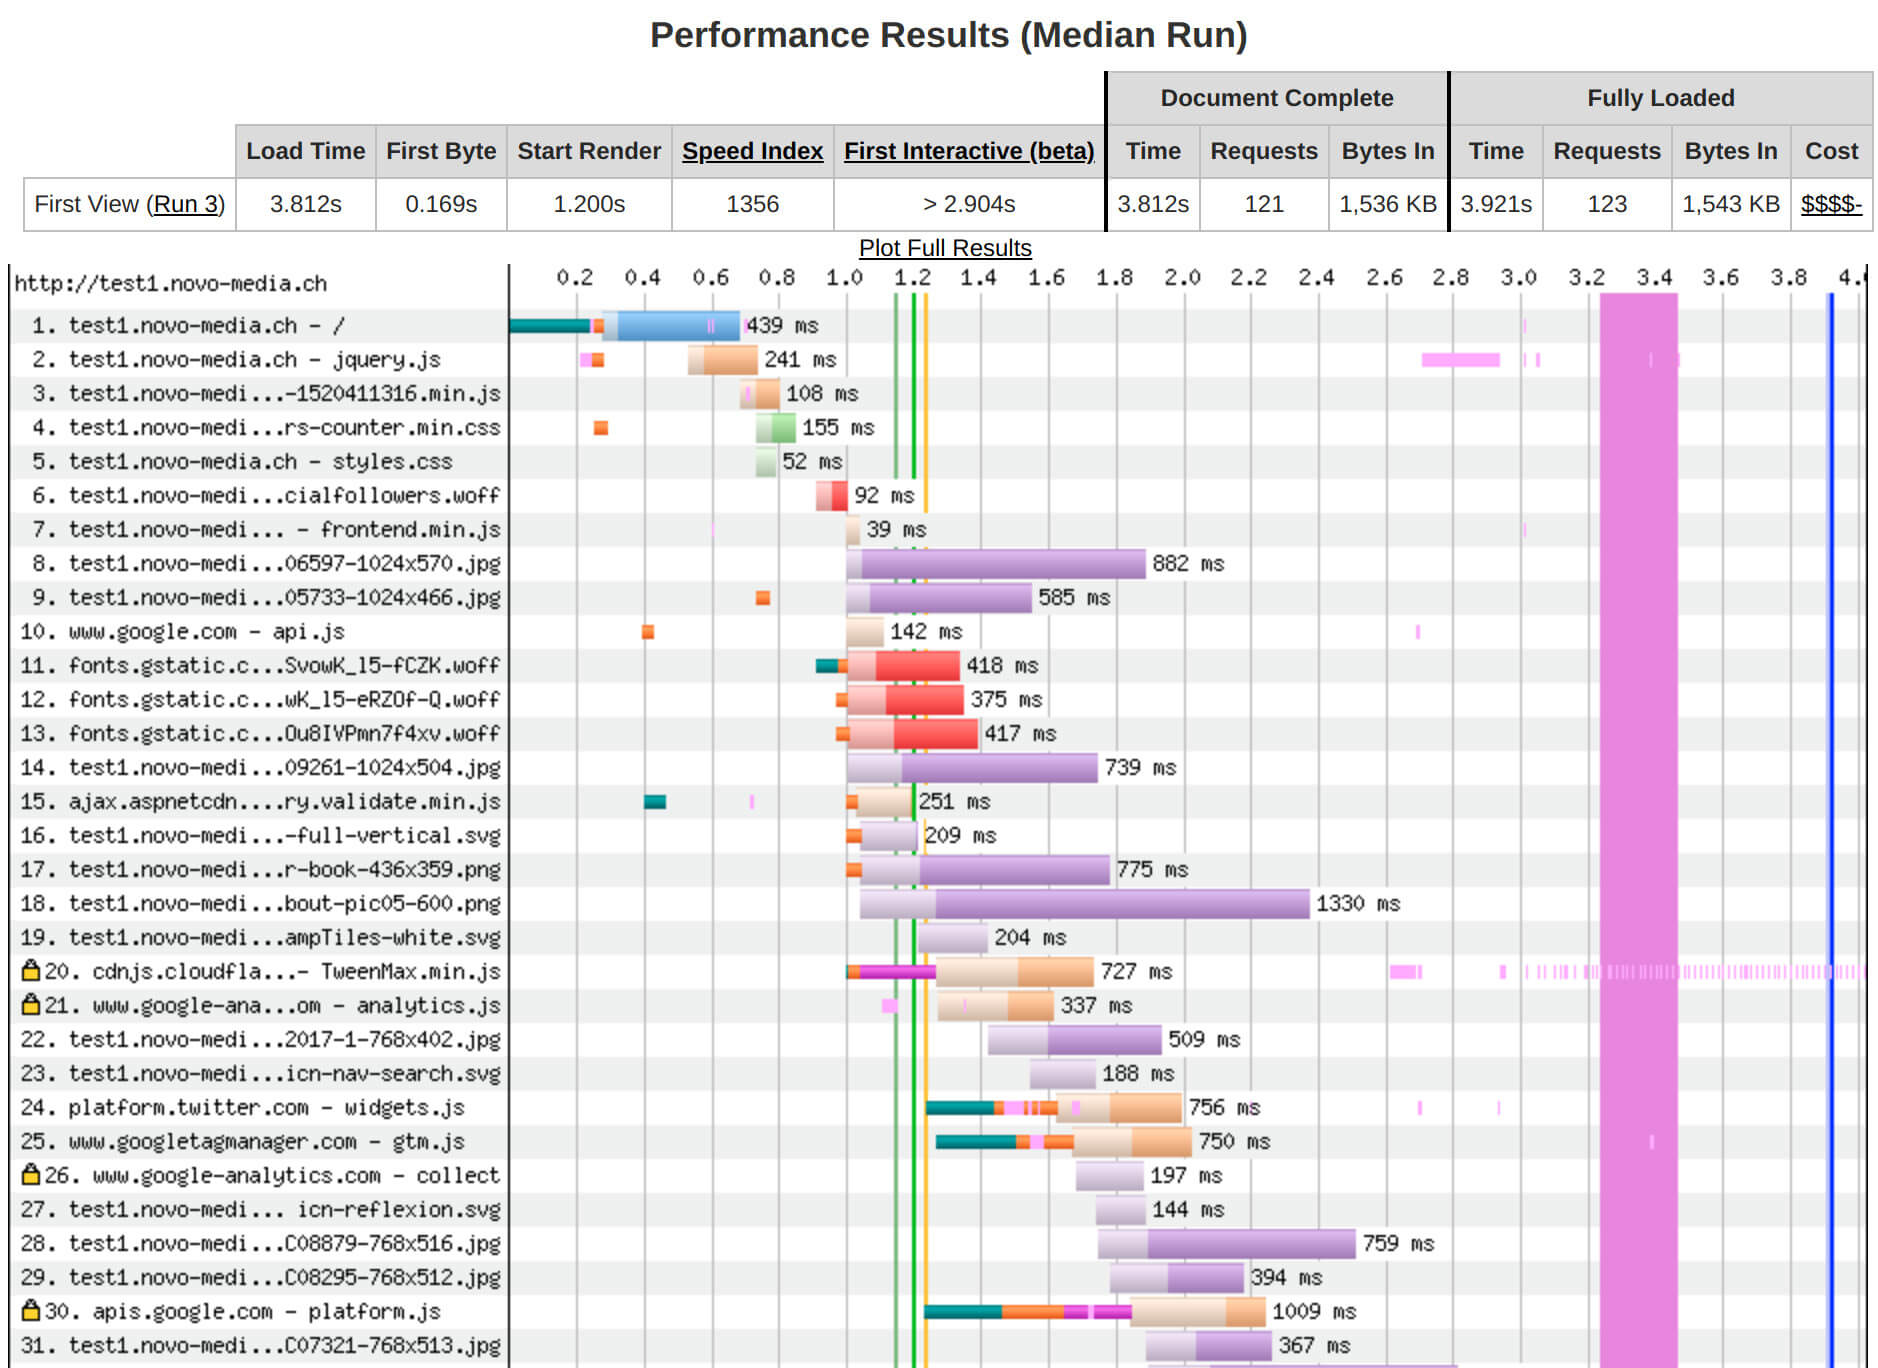
But that time is over with the arrival of http2 since the end of 2015. This new version of the http protocol brings many new improvements that make some of the optimization techniques used so far obsolete. The main improvement of http2 is that it allows multiple requests to be made through the same connection. So the browser connects to your server and all requests are made through the same connection (see screenshots). With http2, it is also the browser that decides in which order it needs the files to display the page as quickly as possible… it is no longer the order in which the requests were made.
I tested the home page of our blog on the test server (http1.1) and on the production server (http2) with the WebPageTest tool I mentioned above that supports http2. Here is the result:
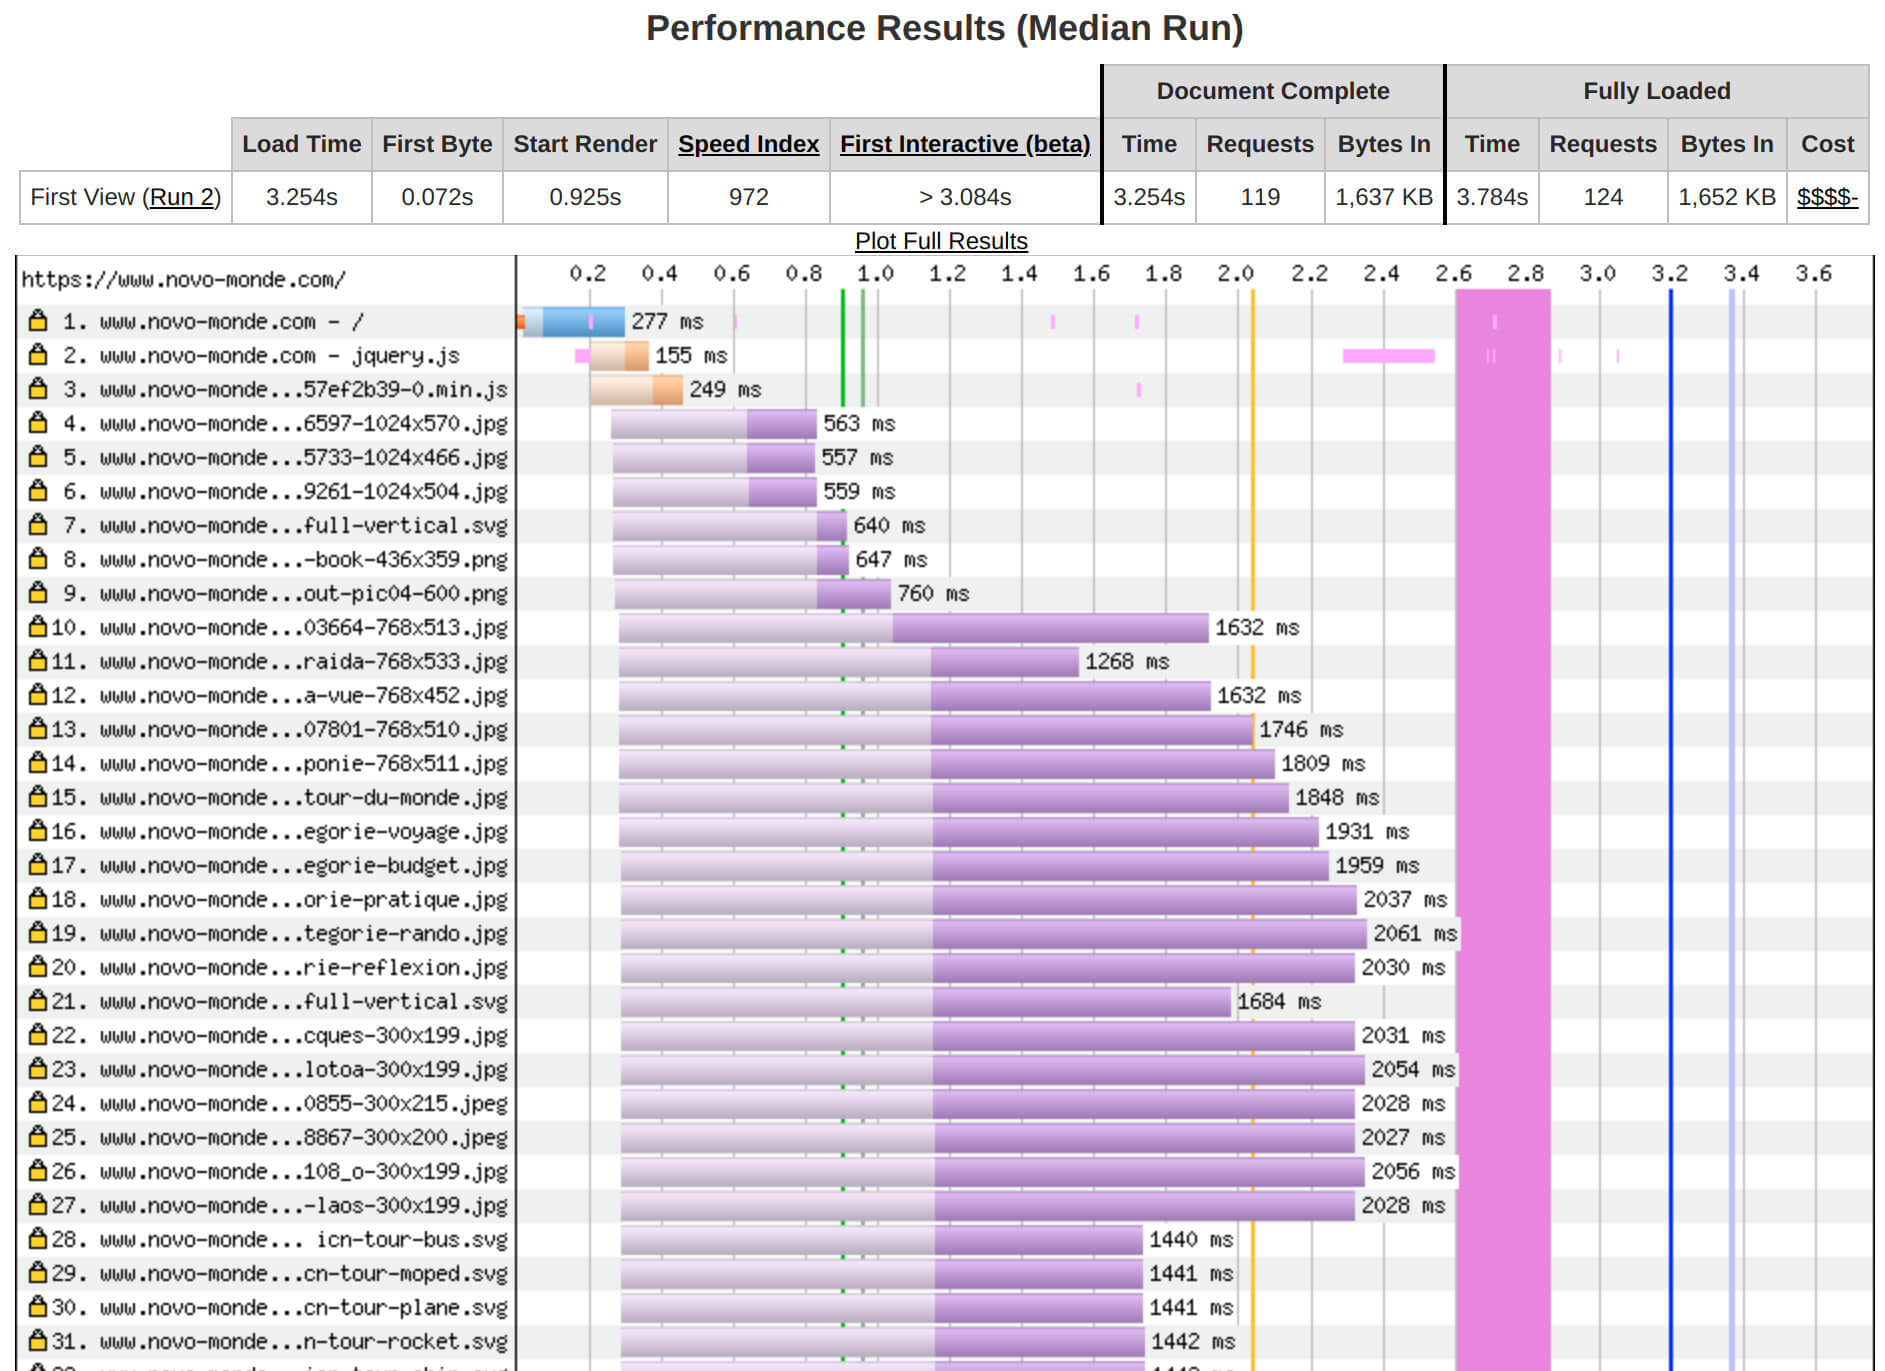
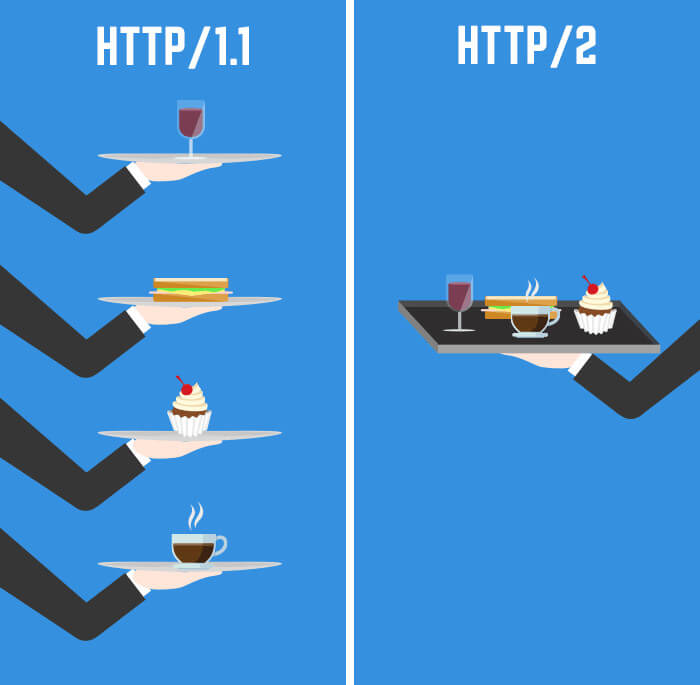
An analogy to better understand would be that of a bar where 6 servers can only take one thing at a time on their set while in the other bar, a super tall server can put as many things as he wants on his set and distribute them in the most optimal order.
With http2 therefore, all techniques that aim to reduce the number of requests become obsolete… only techniques that aim to reduce the size of downloaded files remain valid (minify js and css files, image sizes etc…).
Personally on the same pages with the only difference between http1.1 and http2, I noticed an improvement between 10% and 20% in performance with http2
You will tell me then
cool but how do I install http2 on my site?
You need 2 things :
- That your site is under https (because browsers like Chrome only activate http2 if your connection is secure)… so one more reason to switch to https if you were still hesitating.
- That your web server (apache, nginx) has activated http2 (to be discussed with your host)
Once these two conditions are met, http2 will be activated automatically!
You can test here if your website works with http2
Limit external resources
By external resources I mean all the elements that you use on your site but that are not hosted on your server. I will give you some examples to help you visualize better:
- google analytics scripts
- Iframes you can insert in your articles (Google Map, videos, etc)
- Fonts (google fonts)
- facebook or twitter sharing widgets
- amazon images for affiliate marketings
- ad banners
- external scripts used by a plugin
- etc…
The problem with external resources is that since they are not on your server, they are difficult to optimize (you do not control the size of these files, how they are cached etc…). In addition, each external resource that arrives from a new domain name will require a new DNS request (and therefore a new connection). So certainly you can hardly do without a google analytics or writing fonts, but for the rest it is completely possible. This is a point on which I have worked a lot on novo-monde at the beginning of 2019… For example, I have replaced all social network counters with simple buttons (links) that no longer make any calls to external APIs such as facebook, instagram or twitter.
Conclusion : External resources can sometimes slow down a website enormously. Analyze your download cascades to see if you don’t have external resources that slow down your site. And before adding an nth facebook widget, instagram etc… ask yourself if it is really necessary or if the speed of your site is not more important.
Complexity of html, css and javascript
Your browser first receives the HTML of the required page and builds what is called the DOM (basically it creates a kind of tree diagram of your page). Once the DOM is created, the browser will then handle all the CSS and JS files it encounters during HTML analysis. CSS files will be responsible for formatting the DOM (position and style of the elements) while JS files will be able to modify the DOM (and CSS too) to make the pages dynamic and interactive.
What you need to remember is that if your CSS and JS files are very large and complicated, your browser will first need time to download them. But most importantly, it will then need more time to read these files and interpret them, which will slow down the final rendering of the page. So before adding plugins to style and animate your website, think first about whether you really need this icon or this additional animation.
But it’s all a matter of choice… for example on our travel blog we use a plugin that allows us to easily manage all our forms, to do AB testing, to know the conversion rates of subscription to our newsletters etc…. But this plugin unfortunately comes with a lot of CSS and JS in addition and certainly costs us 0.2, 0.3 sec of loading time. But we accept it because we really need the features that this plugin provides.
Whether it’s external resources or the complexity of HTML / JS / CSS, it will mainly depend on the theme and plugins you have installed on your WordPress site. To help you choose a fast WP theme that doesn’t use tons of useless CSS or JS and doesn’t rely on external resources, I’ve written a complete guide (with test and comparison) of the fastest WordPress themes.
read our guide about the fastest WordPress Themes
Images
Image compression
You have already done all the above mentioned things but your site is still a little slow? Perhaps then your images are too heavy… Imagine, in 2018, images represent 50% of the total bandwidth on the Internet. This means that 50% of the volume of files that flow between browsers and servers are images (and this is probably even more so for travel blogs that use a lot of images).
In general, the format of the images used on the net are either jpeg or png that you get from your camera or directly after processing a raw file in a software such as lightroom. Typically these images weigh between 0.5 and 10 Mb depending on their quality and size.
But if I told you that without changing the dimensions of the image while keeping a very good quality, you could greatly reduce the weight of your images. It may seem too beautiful, but it’s possible.
The idea is to remove all the information that is not necessary to display an image on the web (metadata) and then to optimize the image to compress it without the loss of quality being visible to the naked eye (using powerful algorithms). To give you an idea, weight reductions of 70-80 % can be achieved on a normal jpeg almost without any visible loss of quality. Imagine… If you don’t optimize the size of your images yet, the gain in terms of weight of your web pages and loading speed could be really important!
There are 2 tools I recommend to optimize your images in WordPress:
Be careful, to get a good optimization of your images, you will have to use the paid versions of these plugins… but believe me, it is really worth it and these 2 plugins are the cheapest on the market (you will pay between $0.001 and $0.003 per optimized image)
For more details on the topic of image compression, I invite you to read the detailed articles I wrote about this below.
How to compress the images of your wordpress site
Test and comparison of the best WP image compression plugins
Implement responsive images

Having well optimized and lightweight images does not mean that your theme will integrate the images in the right way depending on the type of screen (retina or not) or its size (laptop, tablet, mobile). To fully understand how to have adaptive images in wordpress, you must first understand what happens when you add an image to your media library. When you put an image in the library, wordpress will immediately create at least 5 copies of the image (it can vary according to the themes) with different dimensions (150px, 300px, 768px, 1024px, original) and store them on your server.
Then let’s take the concrete case of a floating image on the left on a responsive website like our novo-world blog:
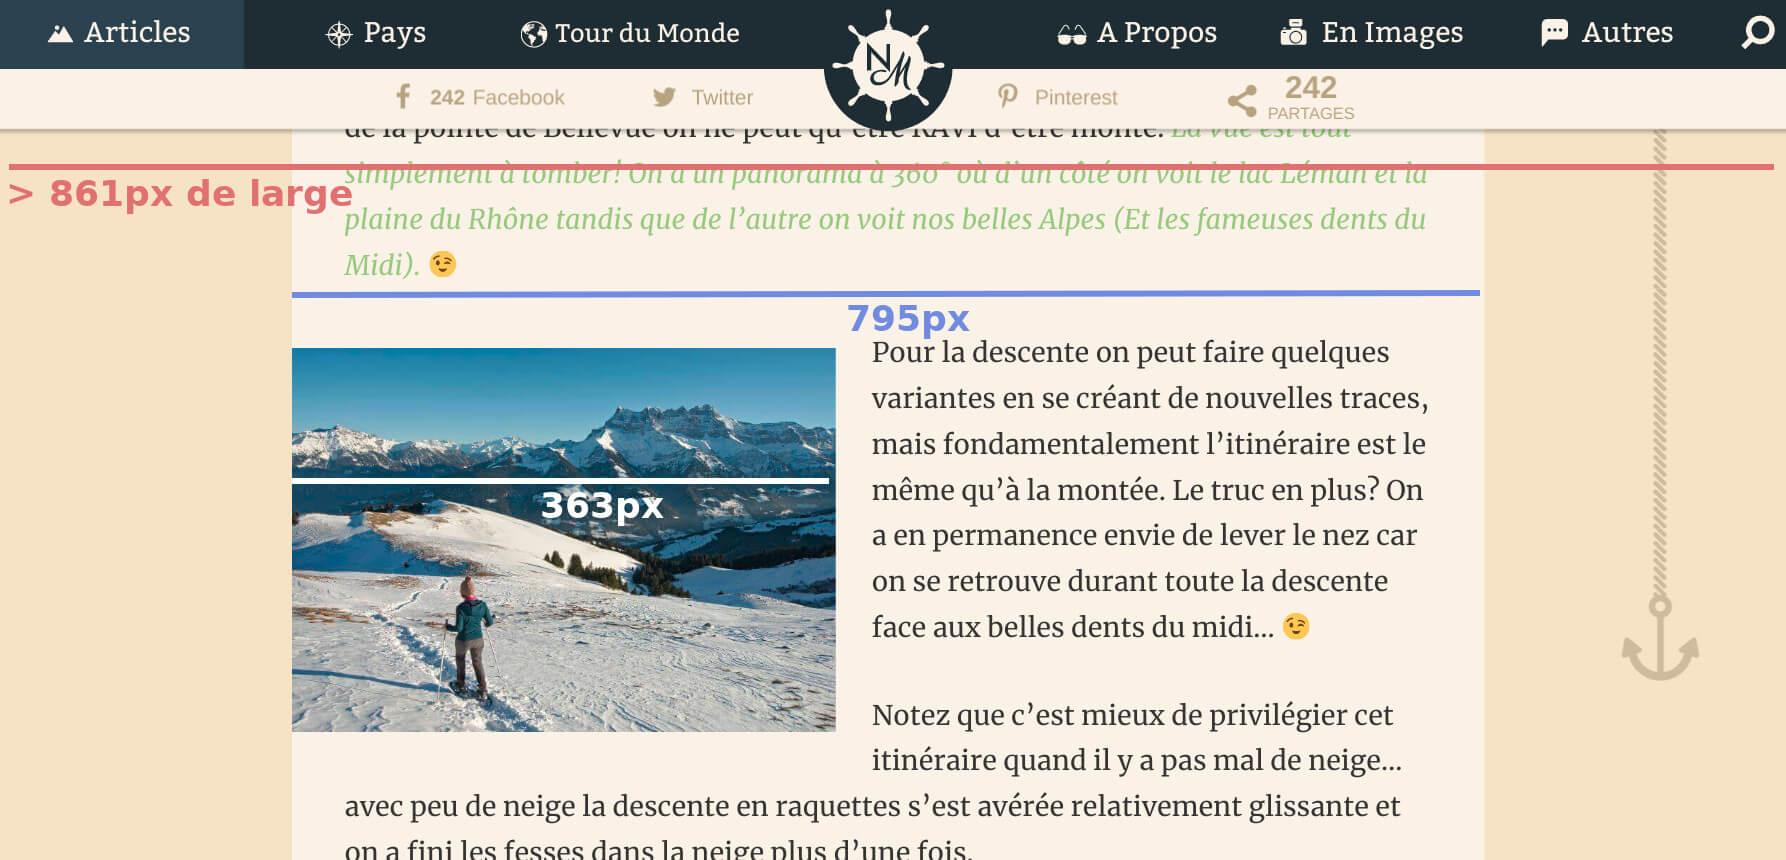


Guess in which case the image is displayed with the largest dimensions?
On mobile when the screen is 480px wide. In addition, if you have a retina screen, the necessary image should be even twice as large.
But in the end, when you write an article or page in WordPress, you insert only one image (despite the fact that you have different image sizes at your disposal). So how do you ensure that the correct copy of the image is used according to the type and size of the screen of the device visiting the page?
In fact, there are 2 new attributes of the image html tag that allow browsers to choose the best image available to them depending on the situation.
- Before WP 4.4, when you inserted an image into an article, here is the html tag that was created:
<img
  class="alignleft"
  src="http://unblogcool.com/wp/wp-content/uploads/2018/03/grande-photo-1024x700.jpg"
  alt="le alt de mon image grande"
>
- After WP 4.4 you can see that the tag has evolved well with the arrival of two new attributes that are srcset and sizes :
<img
  class="alignleft"
  src="https://unblogcool.com/wp/wp-content/uploads/2018/03/grande-1024x723.jpg"
  alt="le alte de mon image"
  srcset="
    http://unblogcool.com/wp/wp-content/uploads/2018/03/grand-1024x723.jpg 1024w,
    http://unblogcool.com/wp/wp-content/uploads/2018/03/moyenne-300x212.jpg 300w,
    http://unblogcool.com/wp/wp-content/uploads/2018/03/moyenne-grande-768x542.jpg 768w,
    http://unblogcool.com/wp/wp-content/uploads/2018/03/tres-grande-1508x1065.jpg 1508w,
    http://unblogcool.com/wp/wp-content/uploads/2018/03/photo-originale.jpg 3200w"
  sizes="
    (min-width: 861px) 363px,
    (min-width: 481px) 50vw,
    100vw"
>
Let’s analyse together the new elements of the img tag:
- the srcset attribute : it contains the urls of all the copies of an image (with different dimensions) with additional information on their width
- The sizes attribute : describes how the image behaves according to the width of the screen
If these two attributes are correctly set up, the browser will choose the best available image based on the size and type of screen that displays the page. For more details on adaptive images and how to correctly set up these two attributes, I invite you to click on the button below.
Warning: Just because you have a version of WordPress greater than 4.4 does not mean that these attributes are correctly implemented! It will mainly depend on the quality of your theme!
how to have responsive images on your WordPress site
Svg images
.svg or vector images are a very special image format that can be resized without loss of quality. This means that even if you display a very large vector image, the weight of the image will always be the same and the quality will remain perfect. This type of image is particularly interesting in responsive designs because you only need to put an image that you can resize without loss of quality depending on screen sizes and types.
But since nothing is perfect, vector images can only be used for logos or icons. A picture coming out of your camera can never be converted to vector format. However, I recommend that you use this format for all your icons and logos.
Lazy loading of images
I just gave you a whole theory on how to reduce the weight of your images and have adaptive images. But if I told you that it is possible to delay the loading of images and only display them when your readers need them (i.e. when the image arrives on the screen during scroll). This technique is called “lazy loading” or “delayed loading” and is not really new.
Even if this technique has only advantages, it must be well integrated into your site in order to be effective. For sites that work with WordPress, there are a lot of plugins to activate the “lazy load” of images. But as usual, many plugins are of poor quality and could do more harm than good to your site. For a lazy load extension, here are the important criteria:
- The integration of a quality lazy load javascript library.
- compatible with the new srcset and sizes attributes of the img tag
- integration of the
<noscript>tag as an alternative to display images if javascript is disabled by the browser. - Possibility to fill up the space dedicated to the image on the page to prevent the content from jumping when the image appears.
- code quality
After having tested quite a few different plugins, I have selected 2 of them which, in my opinion, meet these criteria:

 Lazy Loader : This plugin use the very nice lazysizes.js library to delay the loading of the images. The plugin is super well coded and meets all the other criteria mentioned above. The best I’ve found so far.
 A3 lazy load : It is one of the most popular wordpress plugins for lazy loading (but one of the only ones that is of quality). It uses a slightly less popular library than the previous plugin (lazy load xt) but is well coded and also meets all the criteria mentioned above.
Conclusion : If you put a lot of images on your pages, integrating the “lazy load” technique can bring a big boost to your loading speed by greatly reducing the initial weight of your pages.
Server location
main server location
It may seem obvious, but the server of your site must be as close as possible to the majority of your readers. If your site is located in the United States and your readers are mostly French, each request will have to “travel” much more and waiting times will be much longer.
But don’t worry, most good hosts will allow you to choose between different server locations.
Use of a CDN or not ? (content delivery network)

You may have already heard about CDN’s and perhaps you have been told that it is essential to improve the loading speed of your site… But first, what is a CDN?
A CDN is a network of servers located around the world. When you use a CDN, your site is copied to each of the servers in the network. The idea being that if people connect to your site from abroad, they receive your site from the nearest server, thus greatly improving the performance of your site anywhere in the world! (You can imagine that if one of your readers is in Australia and your website is in France, the request has to go much further and will therefore be slower)
As you will have understood, a CDN is particularly interesting if you have an international readership. If more than 80% of your readers come from France and the server of your site is located in France, you do not necessarily need to set up a CDN. Obviously a CDN could be useful for the remaining 20%… So if you want to speed up your WP site with a CDN, I also wrote a complete guide about how to setup the Cloudflare CDN for free on your WordPress site.
Read my guide to setup Cloudflare CDN for WordPress
Useful resources to improve the speed of your site
I have told you about several useful tools to improve the loading speed of your site in this guide. But as some tools are used to improve many of the points mentioned above, I thought it would be better if I created another page listing all the plugins, tools, hosts that could help you optimize your site. You will find this list by clicking on the button below
Useful resources to optimize the speed of your wordpress site
There you go, I think I haven’t forgotten anything important! In any case if anything is unclear or you have suggestions to improve this guide, feel free to leave a comment!
Useful links
I also invite you to read Kinsta’s excellent guide of more than 25,000 words on how to accelerate your WordPress site. It is one of the only guides (with the one I wrote here that is already 7000 words long) that gives concrete examples with tests on how to improve the loading speed of your WP site. Be careful you won’t be able to read it in 5 minutes 😉
P.S. This article contains some affiliate links. This means that if you buy a license for some of the products I recommend in this article, I will get a small commission (and of course you won’t pay a penny more). So if you appreciate the explanations and information I have provided in this guide, feel free to use these links.