
When we started writing our articles in French and English on our websites, we soon found ourselves confronted with a problem:
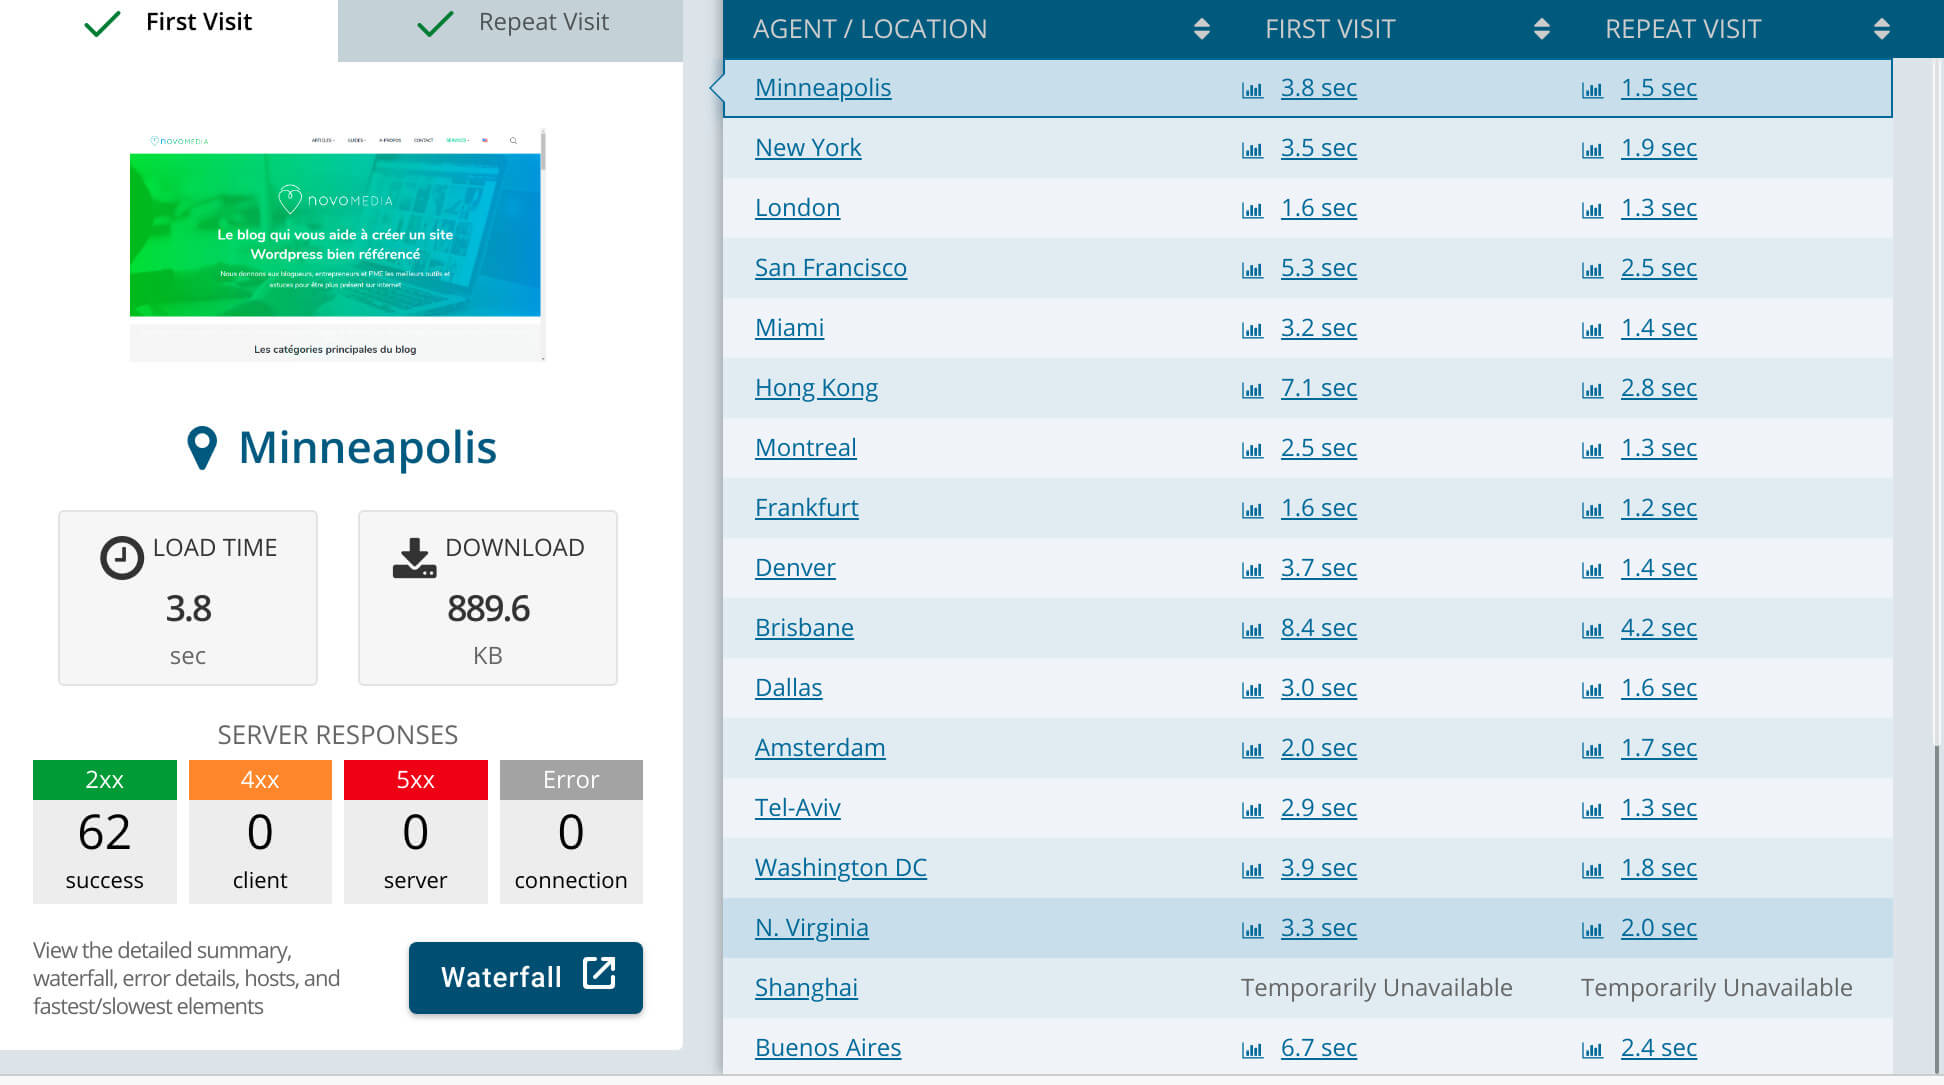
Our websites are VERY slow from countries far away from Europe (Australia, USA, Asia…)
That’s pretty easy to understand. As the servers of our sites are located in France, the content has to travel much further if the visitor is in a very distant country. When we only wrote in French, this problem was less important since 90% of our traffic came from France, Switzerland, Belgium. But at the time of writing, more than 50% of the visitors of this site are English-speaking (a proportion that is also increasing on our travel blog).
The only solution to this problem is to set up a CDN (content delivery network) and Cloudflare is precisely one of the best and biggest CDN available today.
But what exactly is a CDN?
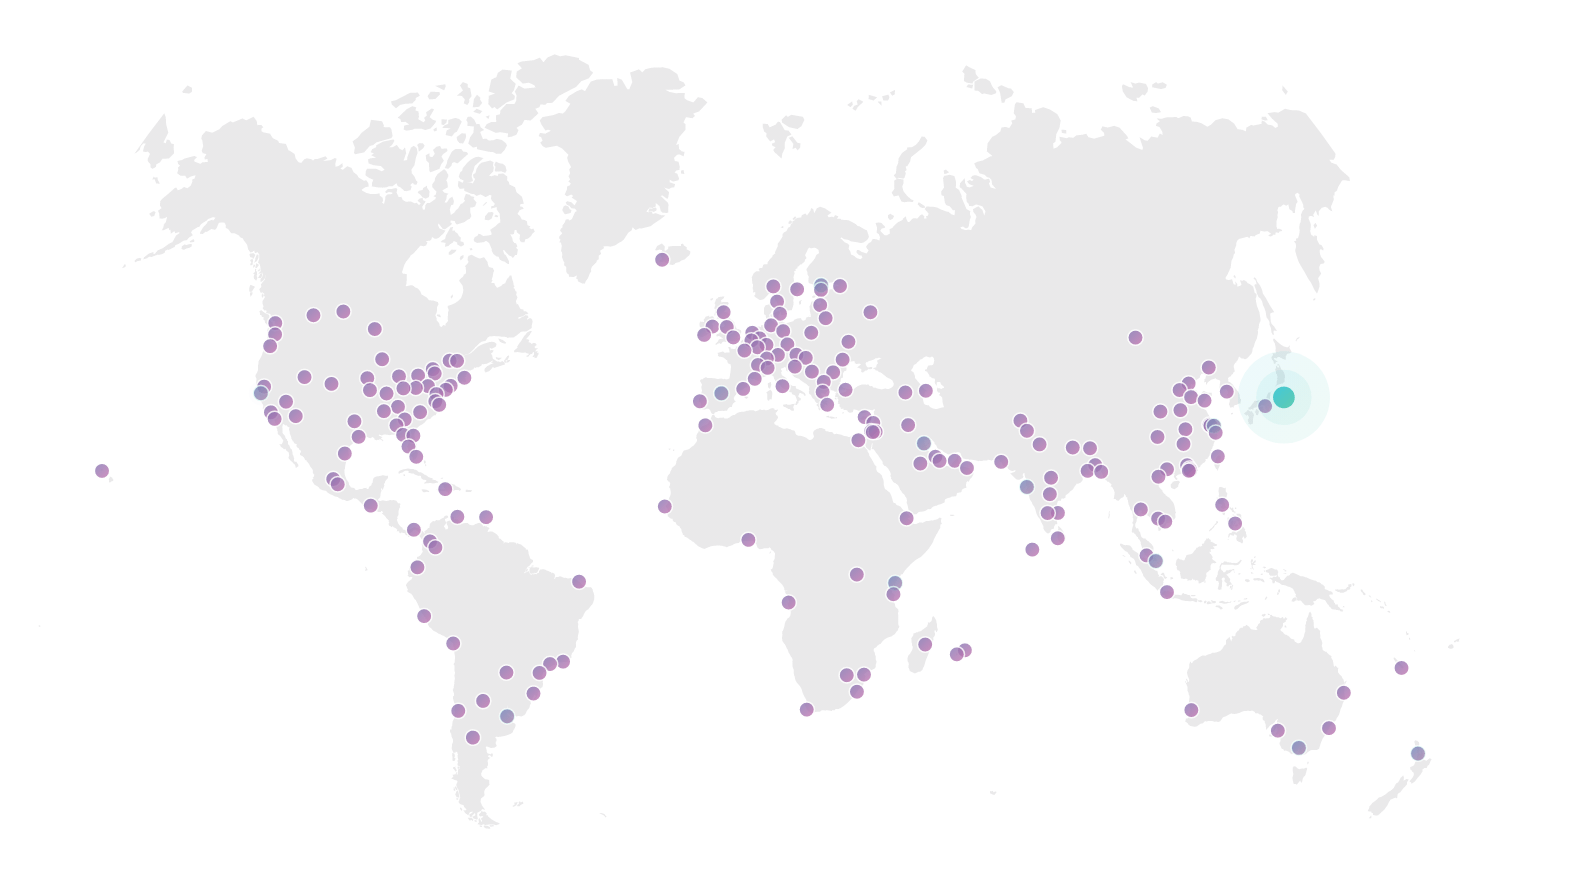
As I already explained in my guide to optimize the speed of a WordPress site, a CDN is a network of servers located around the world. The idea is quite simple: your site is copied on all servers of the network and when a user browses your site, he receives the content from the closest server.
Imagine that you are in Australia and you are looking for information on our travel blog. As its server is located in France, each http request will take much longer because it will have to cross the ocean to France and come back to Australia 😉 . If you have a copy of your site on a server in Australia, the requests will obviously be much faster!
Well, it sounds simple when you put it that way, but when you go into a little more detail, you’ll see that it’s not that trivial to set up (but don’t worry, I’m here to show you how to do it).
Do I need a CDN for my WordPress site?
This is probably the first question you will want to answer 😉 . You should consider installing a CDN if you answer yes to one or more of these questions:
- Do you have an international readership? If a significant part of your readers (more than 20%) connect to your site from the other side of the world, it might be wise to set up a CDN.
- Do you have the impression that your hosting plan is not enough for your traffic? If so, a CDN can greatly reduce the bandwidth (the volume of files transferred) on your origin server by transferring a large portion of your site’s files from the CDN’s servers.
- Have you been a victim of DDoS attacks? This type of attack consists of sending a lot of traffic simultaneously to your site’s server to put it out of action. Thanks to a CDN, you have a whole network of servers at your disposal and it will be much more difficult to shut it down.
These are pretty good reasons to set up a SSC, isn’t it? But as you will see below, Cloudflare is not a traditional CDN and it will allow you to do a lot more. But to understand how it all works, let’s see what makes Cloudflare different from more traditional CDNs.
The differences between Cloudflare and a traditional SSC
Cloudflare and all other CDNs share the same goal: to make your website faster all over the world. But even though the goal is the same, the way Cloudflare works is quite different from most other CDNs.
Cloudflare: reverse proxy, domain registrar and much more
Cloudflare is what we call a “reverse proxy” 😉 … and you might have no idea what these barbaric terms mean (we’ll try to keep it simple). In fact, to use Cloudflare, you’ll have to point your domain name to Cloudflare. As a result, Cloudflare will intercept all requests from your visitors before they even reach your origin server and then make the best use of it (e.g. get information from the nearest server). That’s also why when you use Cloudflare, all your content will continue to be loaded from yoursite.com, whereas with a traditional CDN, your content will be served from a new url like cdn.yoursite.com.

This approach gives Cloudflare a lot of control over your website which allows them to do more than “just” deliver your content from the nearest server:
- Cloudflare is the 2nd largest domain name provider after GoDaddy but has above all the fastest DNS. However, we don’t talk much about Cloudflare and until recently I didn’t know that they allow to buy domain names. So I think that I will probably transfer my domain names little by little to them since they do not charge any additional fees (like GoDaddy for example).
- Cloudflare secures your website in case of DDoS or other attacks
- If you’ve ever had fun setting up a web server like me (apache, nginx or others), you know that it can quickly become complicated. Thanks to its “reverse proxy” configuration, Cloudflare allows you to define page rules easily from its interface without touching the configuration file of your server (but we’ll talk about that below).
- If you still haven’t switched to HTTPS, thanks to its configuration Cloudflare allows you to activate HTTPS in 1 click with free SSL certificates.
- Cloudflare has the largest server network with over 200 locations worldwide. It is to my knowledge the only provider that offers its CDN for free. In fact, almost 13% of all websites use Cloudflare to improve their performance!
- Cloudflare as well as traditional CDNs also allows you to optimize the performance of your website by compressing your files (gzip, brotli…), automatic minification of your css/js files, enabling HTTP2, TLS 1.3 etc…
More traditional CDNs
With a more traditional CDN, you will not need to point your domain name to the CDN. But since these CDNs do not control your domain name, they cannot automatically serve your content from the nearest server. That’s why when using a traditional CDN, you will need to make sure that the urls of your files (images, css, js etc…) are rewritten from yousite.com to cdn.yousite.com for example. In general, most cache plugins (w3 total cache, wp rocket…) allow you to do this easily by entering the url of your CDN in the parameters.
Traditional CDNs will then automatically “pull” the content of your site and distribute it on their network of servers. Thus, each time a visitor will make a request that contains the url cdn.yoursite.com, the file will be delivered from the nearest server. Some examples of traditional CDNs:
- Amazon Cloudfront
- Key CDN
- StackPath
- Bunny CDN
- Jetpack (you may have noticed that if you have activated the image CDN option of Jetpack, the urls of all your images are different)
- …
How to set up Cloudflare on your WordPress site
Well I have to admit that when I decided to set up a CDN on this site, I was expecting to pay for this service (we already pay for a lot of tools such as keyword research, e-mails, image optimization, backups, good hosting etc…). But, after a lot of research on the net, it turned out that Cloudflare was a tool that was rather easy to set up and above all free for most of its users (there are paid options but for a wordpress site, the free version is usually sufficient). And frankly, I couldn’t believe it until I set it up myself! So let’s see together how to install Cloudflare on your WordPress site.
Sign up to Cloudflare and point your domain name to Cloudflare
I admit that this step freaked me out a bit (my domain name settings are a bit complicated)… but I was wrong. Here are the steps to activate Cloudflare manually:
Note: Some popular hosting providers like Siteground allow you to activate Cloudflare more easily from your cpanel. But if you don’t have this option, you will need to proceed as described below.
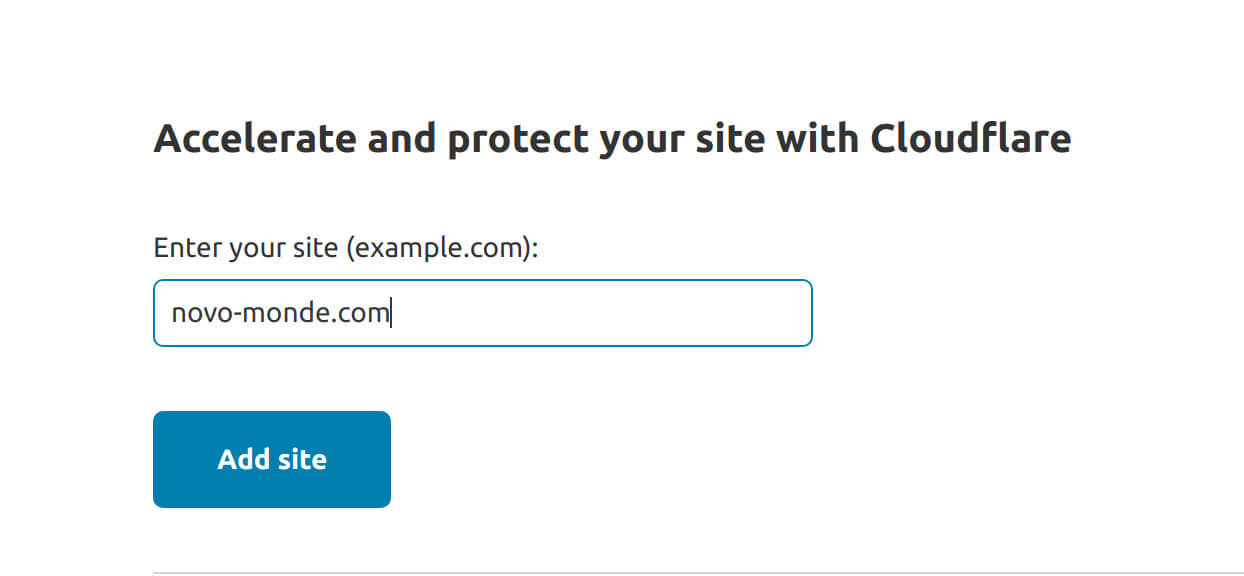
- Create a Cloudflare account
- Add your domain name and let Cloudflare scan your DNS records (choose the free package)

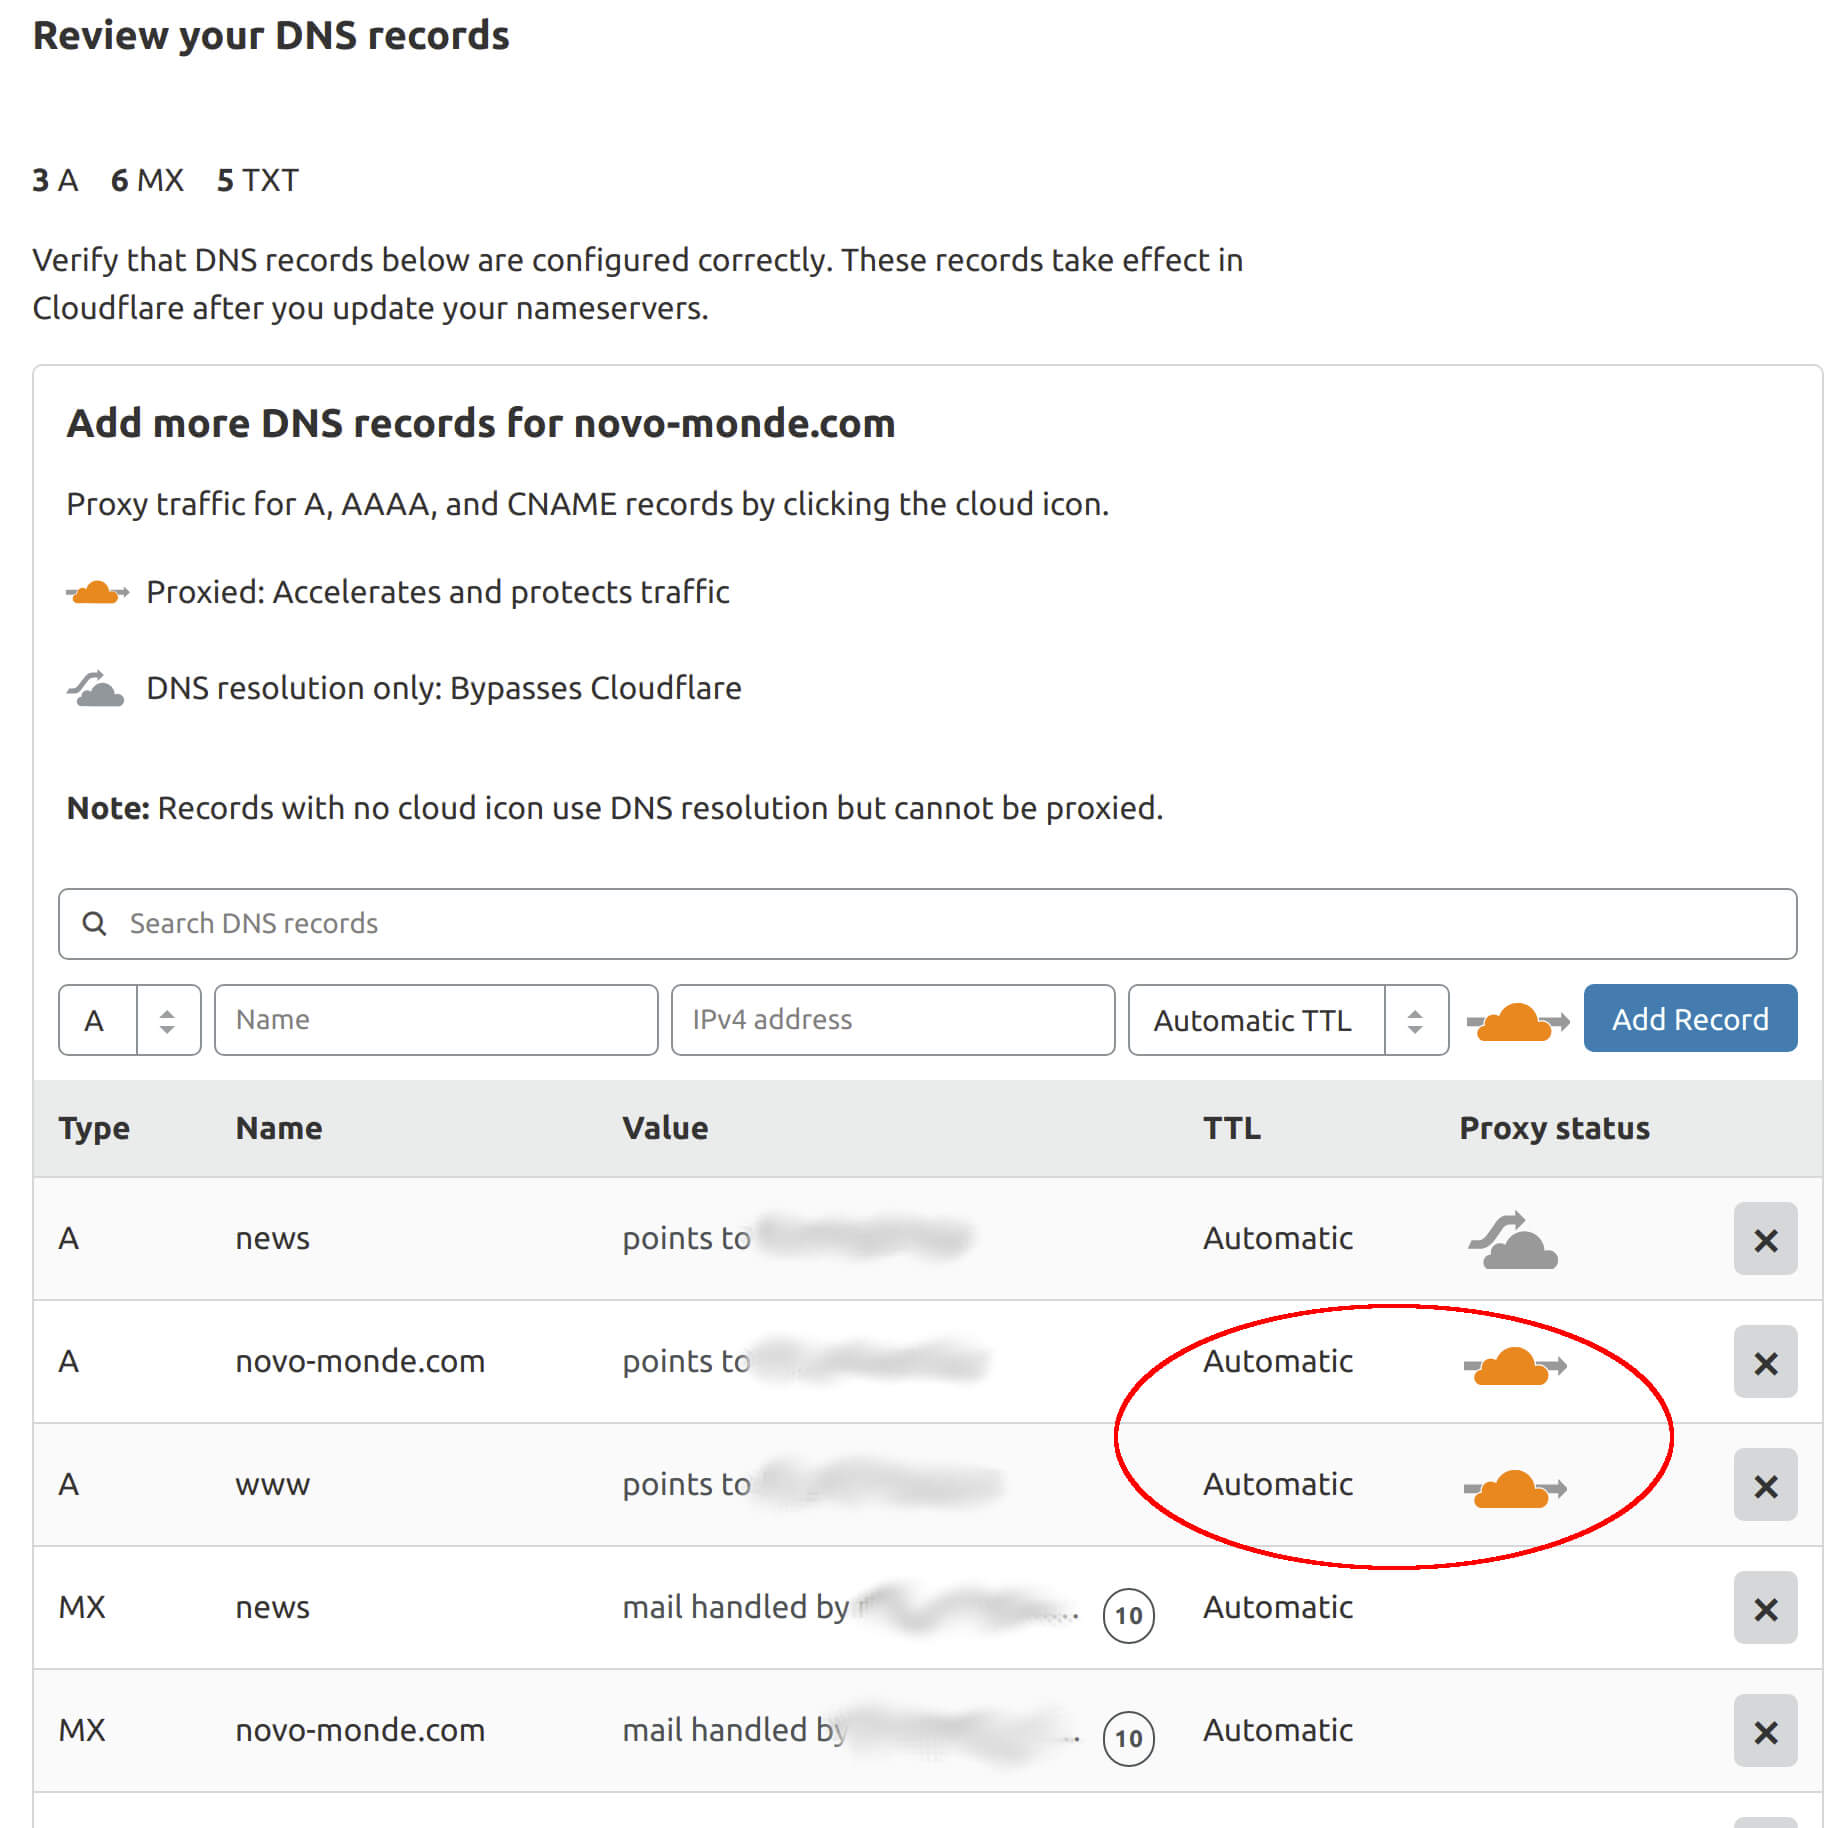
- Check that all your records (A, MX, TXT, NS…) are there and check that there is a little orange cloud next to your domain name and all the sub-domains you want to cache on the Cloudflare CDN (for me it’s novo-media.ch and its sub-domain in www.novo-media.ch).

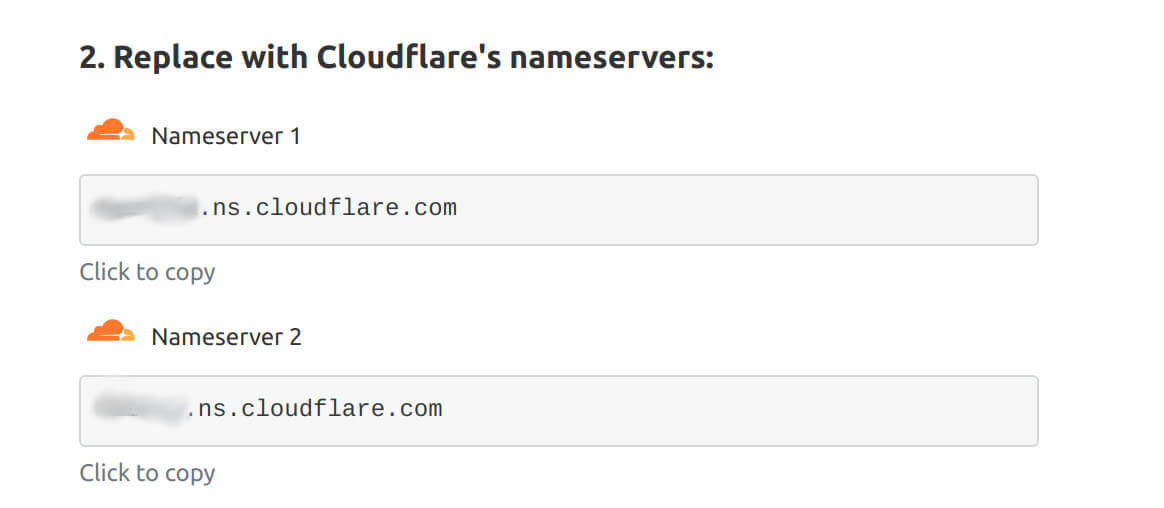
- Login to your domain name host and point your domain name to Cloudflare’s server (if you bought your domain name from Cloudflare, this step is useless)

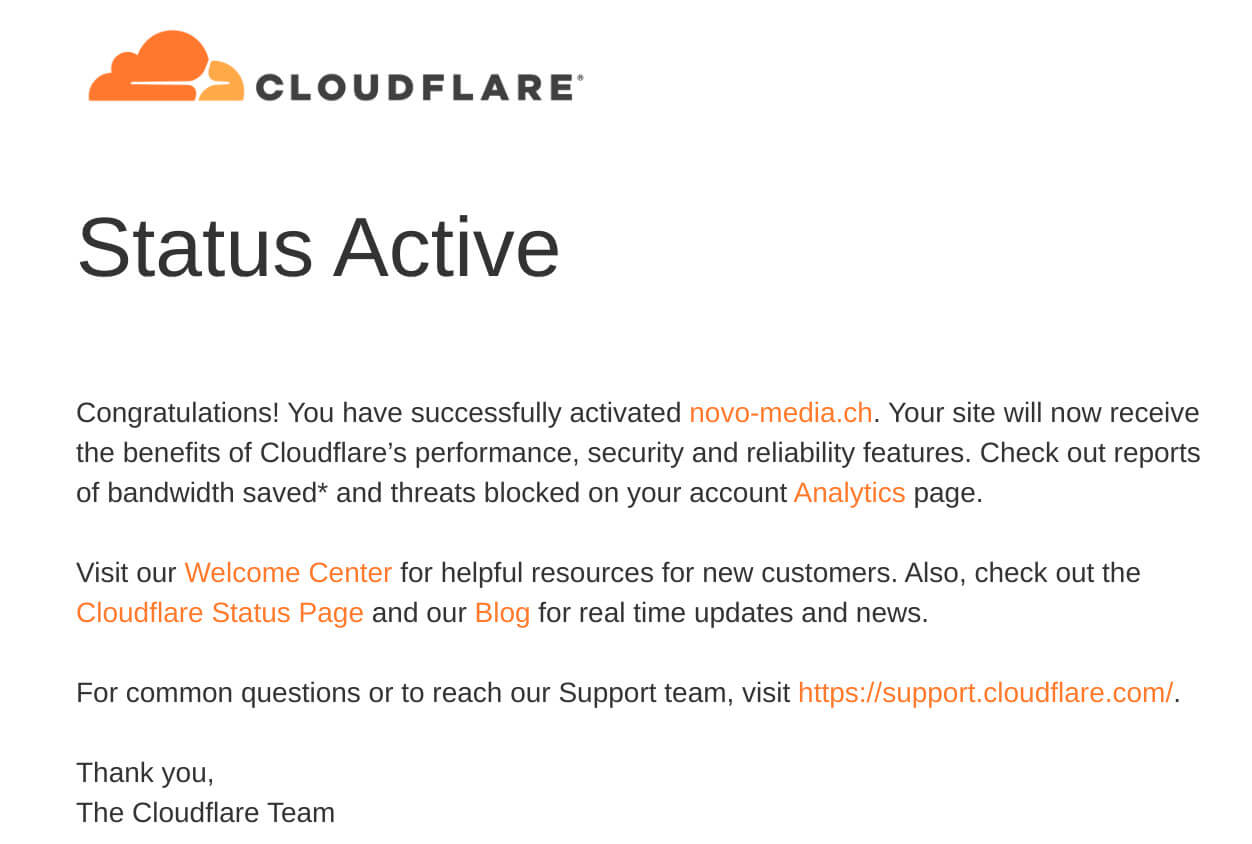
- Wait up to 24 hours for the change to spread (as far as I’m concerned it took 1-2 hours to spread). You will receive an email from Cloudflare confirming that your site is active.

Setting up the Cloudflare CDN for WordPress
Even though Cloudflare is very easy to use, it’s now getting a little complicated. The problem is that Cloudflare settings can be different if you use or not a cache plugin like w3 total cache, wp rocket…, if you use a plugin to optimize your css/js files like autoptimize, fast velocity minify and so on. But hey, I’ll try to tell you what parameter might change if you use the kind of plugin I just mentioned.
The SSL / TLS menu
In the SSL/TLS menu under “overview” you can choose between Off, Flexible, Full or Full (strict). Here there are several cases:
- Off:you shouldn’t have a site without HTTPS anymore, so avoid that
- If you don’t have HTTPS on your site yet (i.e. you don’t have an SSL certificate), you will need to choose the Flexible option (although I recommend you have HTTPS enabled before setting up Cloudflare). If by enabling this option you have a problem indicating “too many redirects”, this wordpress plugin should fix your problem.
- If your site is already under HTTPS, you should be able to choose the Full (strict) option.
Under the “Edge Certificates” menu there are also different options to configure:
- Always Use HTTPS: you can set this option to On
- HTTP Strict Transport Security (HSTS): If you are sure of what you are doing, you can enable this option. Otherwise, just go to the next option
- Minimum TLS Version: You can leave the default option which is TLS 1.0
- Opportunistic Encryption: leave off if you have HTTPS enabled on your website (which should be the case)
- TLS 1.3: you can set this option to On
- Automatic HTTPS Rewrites: if you have “Mixed content” problems, you can set this option to “on”.
The Speed menu
Under the “Optimization” menu, you can configure the following options:
- Auto Minify: If you already use a cache plugin that handles the minification of js, css and html files, you don’t need to enable these options. If you don’t use a plugin for this, you can try using Cloudflare to minify your files and see the result. Personally I prefer to use other plugins with more options like Autoptimize or fast velocity minify for this task.
- Brotli: You can set this option to On. Brotli compression is more efficient and faster than Gzip.
- Rocket Loader: This option is supposed to improve loading speed by loading javascripts asynchronously. Try setting it to On and if you don’t notice any errors in your browser’s console, you can keep this option turned on.
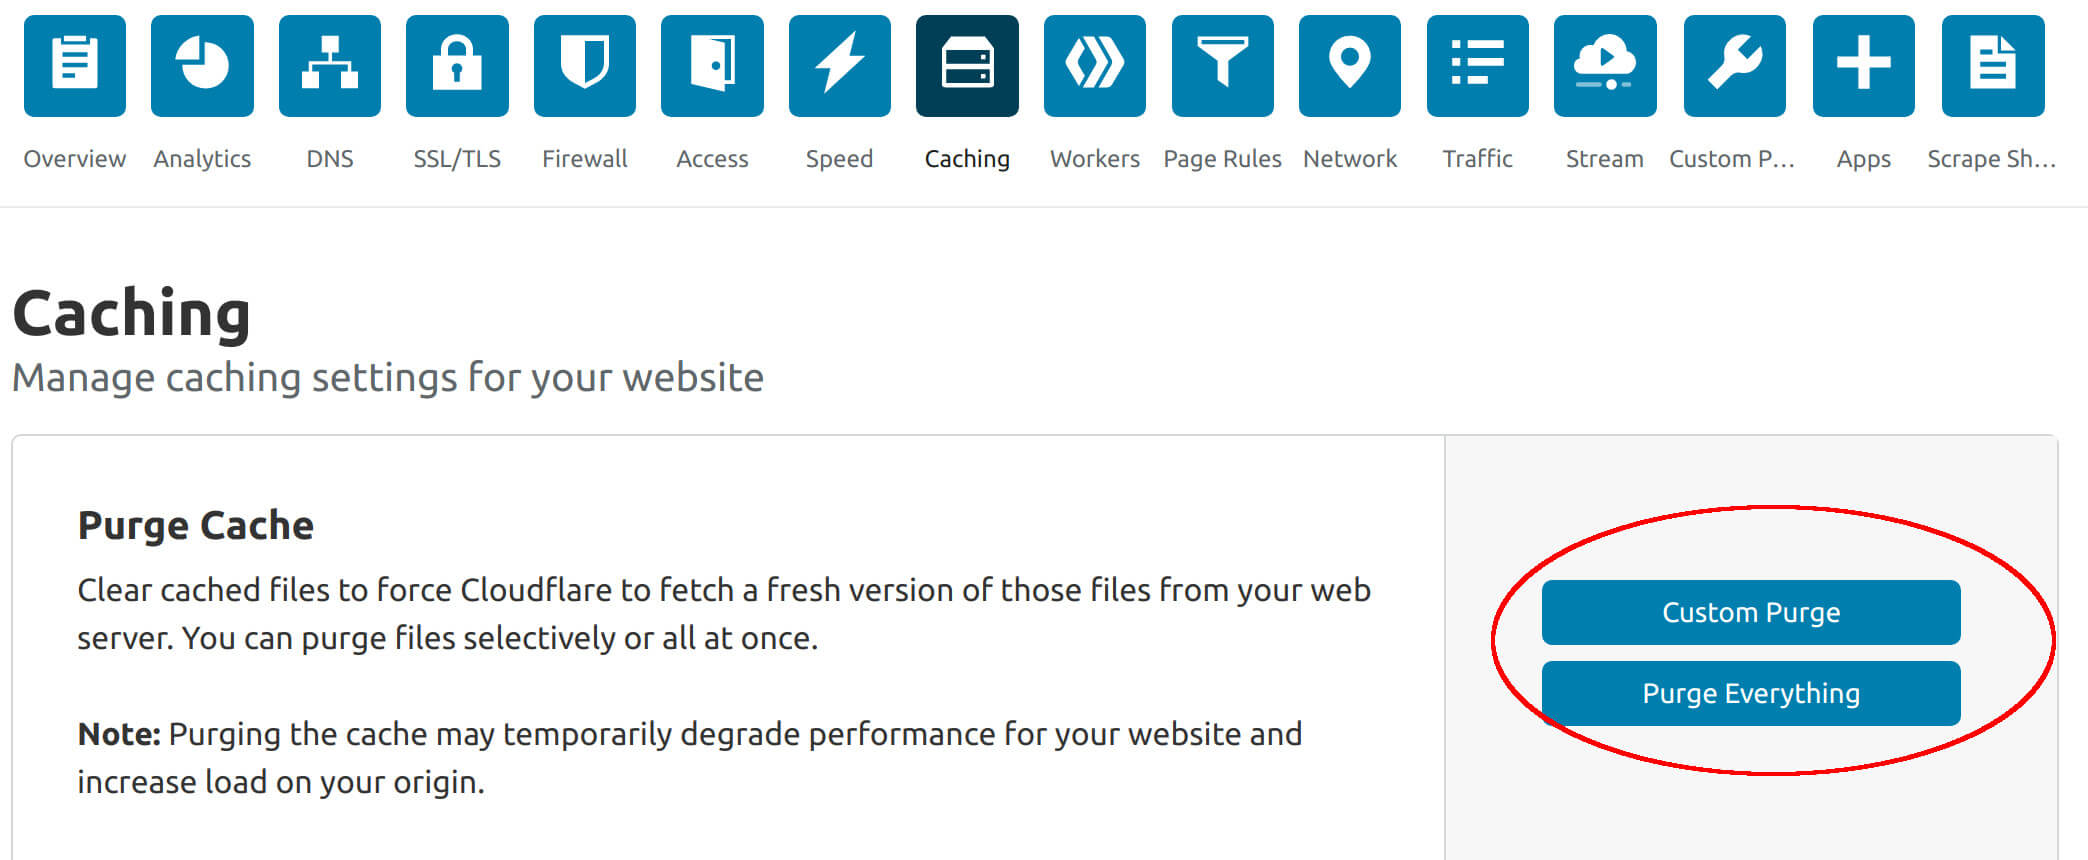
The Caching menu
Under the “Caching” menu, there are several options that will be useful to you:
- Purge Cache: Allows you to clear the CDN cache for all your site or only some urls. This option is very useful especially if you have made changes to your site and you want it to be reflected live on your site anywhere in the world (but I’ll talk about that below).
- Caching Level: choose the option “Standard”
- Browser Cache TTL: If you use a cache plugin like Wp rocket or W3 total cache to configure the browser cache, choose the “Respect Existing Headers” option (if you don’t know what the browser cache is, I explain it here). It’s better to use a plugin to set the browser cache so you can choose a different value depending on the type of file (for images, js, css you can easily choose a long duration like 1 year but for html pages which can change more often, it’s better to choose a short duration from 1h to 1 day). But if you don’t have a plugin you can set a single value here.
- Always Online: If your origin server crashes for one reason or another, with this option turned on, your site will still be visible from the CDN cache.
- Development Mode: If you are working on your site and making changes, enable this option to bypass the cache and see all your changes directly. Obviously, by enabling this option you will no longer have the CDN cache active and your site will be slower all over the world.
How do I check if the Cloudflare cache is working?
Before I go further and tell you about Cloudflare’s “Page Rules”, I will first explain how you can check if your site is properly served by the Cloudflare CDN. There are several ways to do this and you can use for example these speed test tools (you can see the download cascades), but the easiest way to do this is still to use your browser.
Right click on an open tab on your site, choose “inspect” and then click on the network tab. Then reload your page to see the download cascade and all the files that are required by your page.
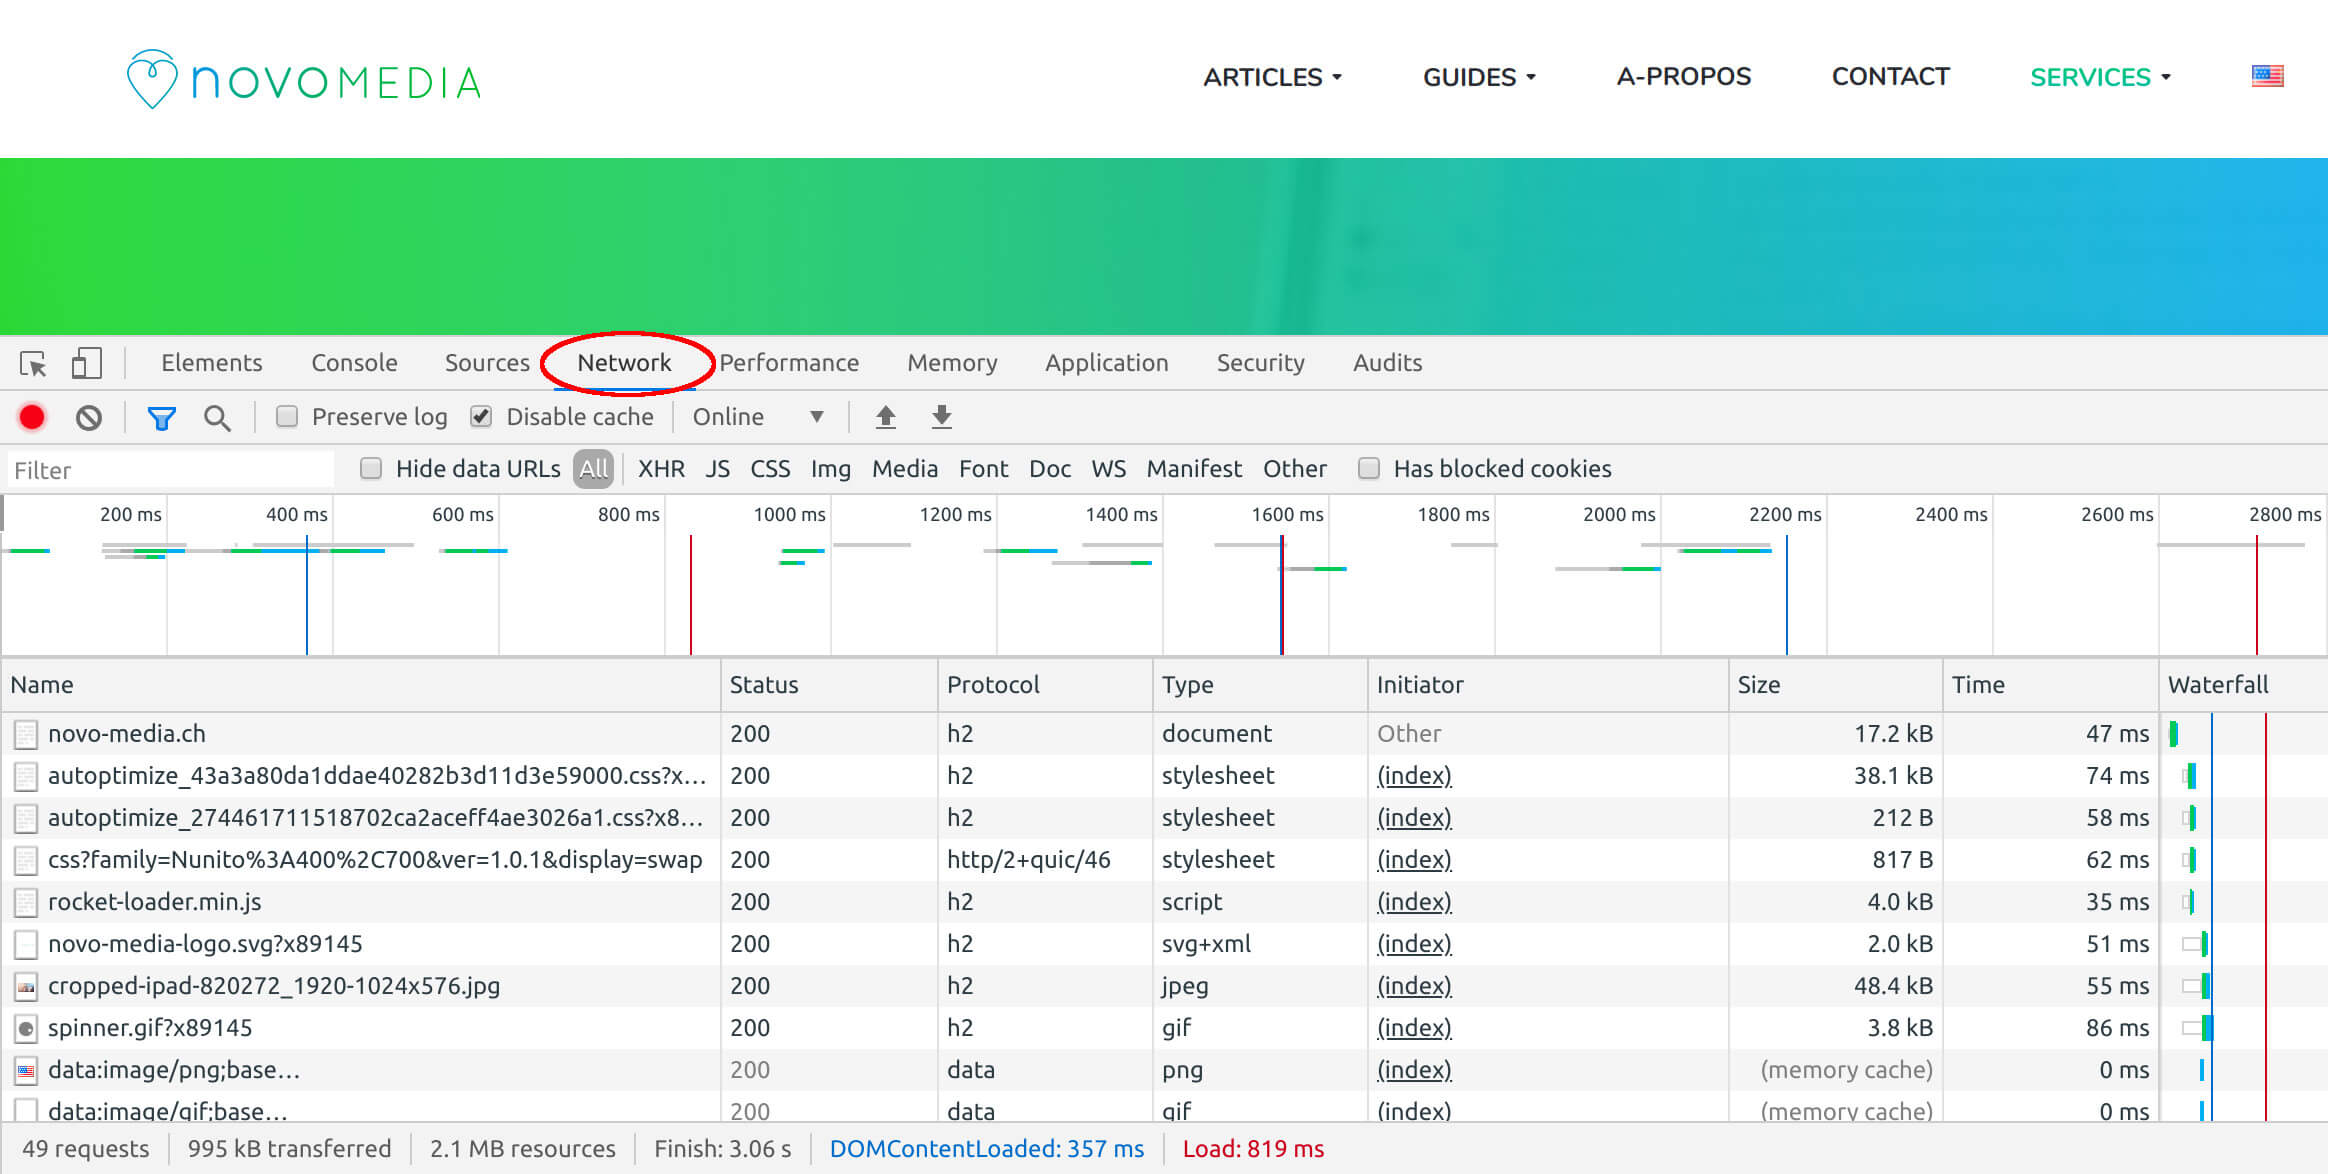
If you click on one of the files required by your page (an image, a css or js) and you have set up Cloudflare with the settings I’ve shown you so far, under the “headers” tab, you should notably see a line with “cf-cache-status”.
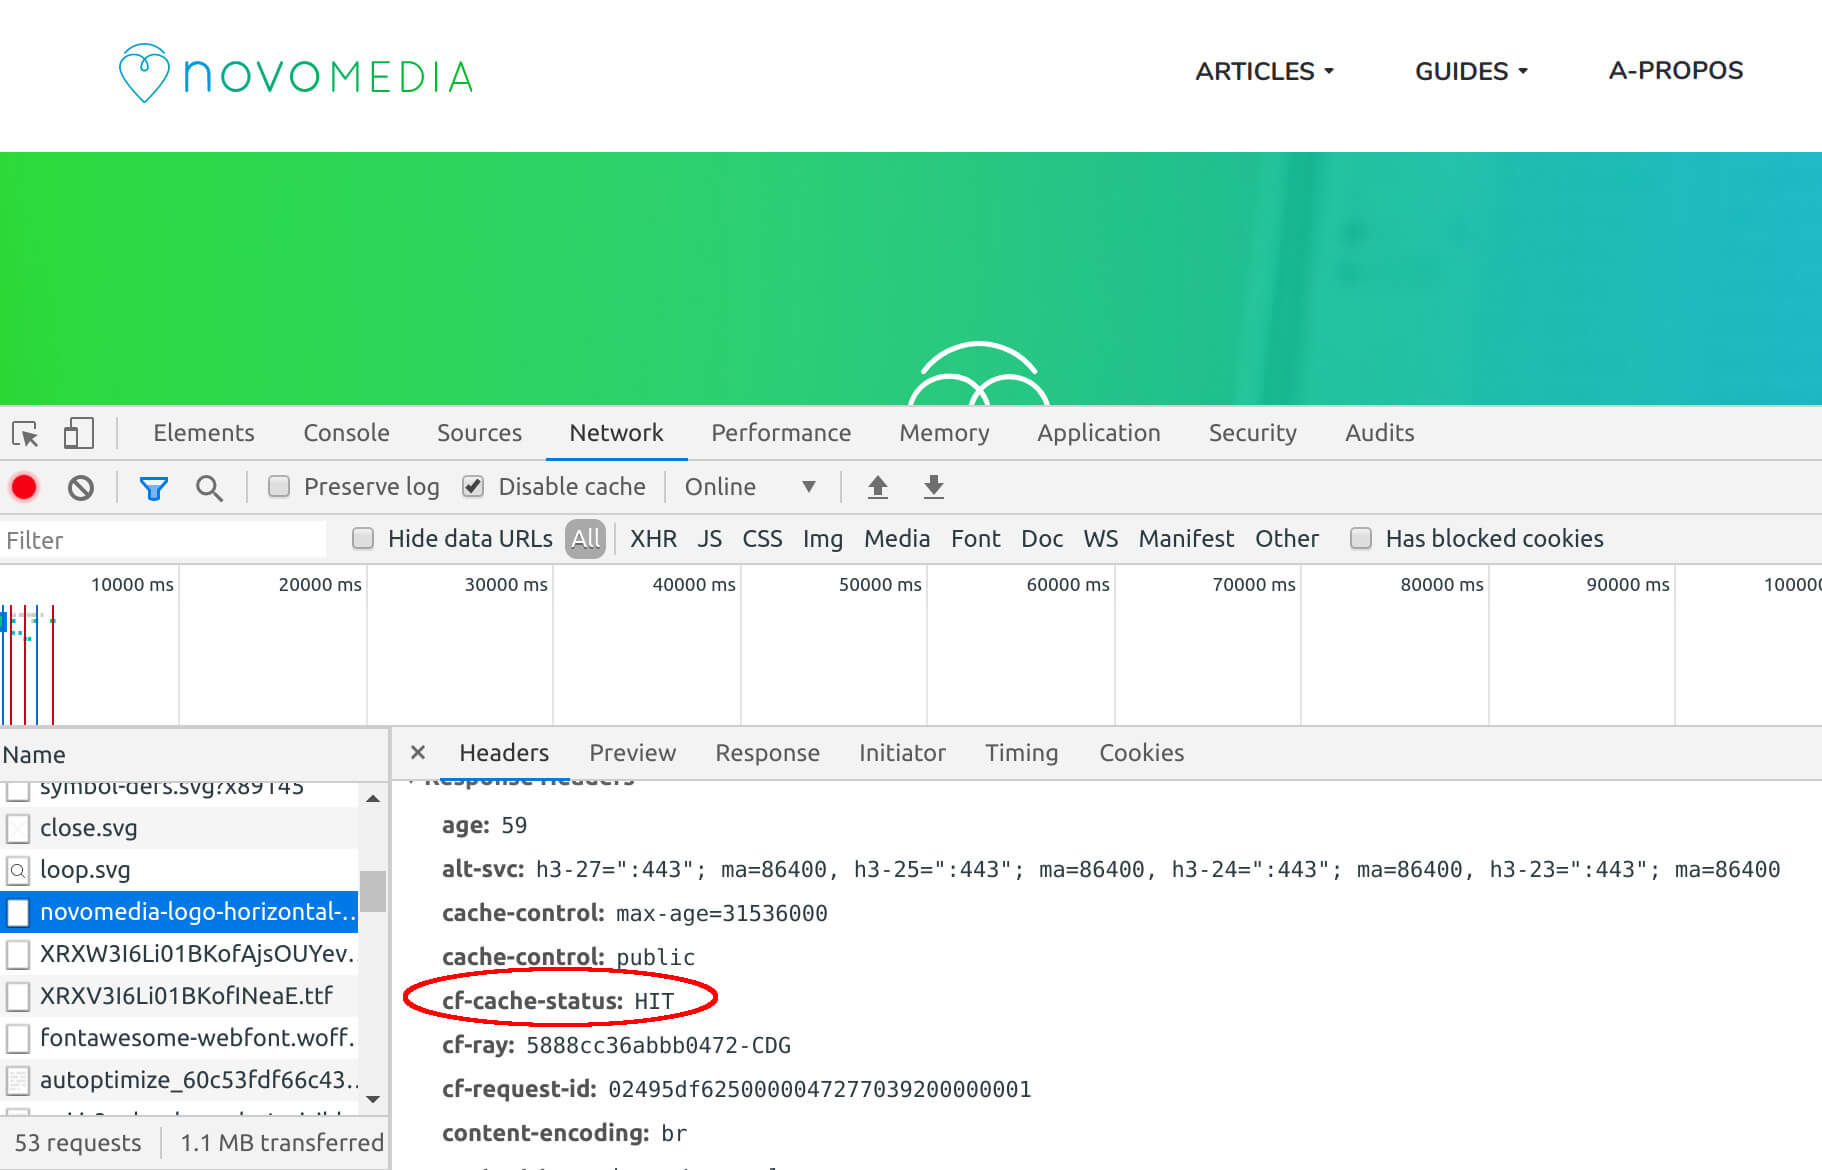
This header indicates the state of the Cloudflare cache for this file and can have the following values:
- HIT: This resource was delivered from the closest server by the Cloudflare CDN
- MISS: Cloudflare searched for this resource in its cache but couldn’t find it and therefore had to take it from the origin server. But the next time this request should be a HIT.
- EXPIRED: Cloudflare had already cached this file but the cache expired and so had to download it from the original server.
- DYNAMIC: This request is not cached by default because nothing has been configured to cache it.
Normally if you have loaded this page more than once (and therefore Cloudflare has already cached these files), all your images, js/css files should have the HIT header indicating that these resources have been served from the nearest Cloudflare server. You’ll also notice that the “content-encoding” header has the value of “br” for Brotli compression which we also configured earlier. That’s already pretty sweet for a free service, isn’t it? And it should already considerably increase the loading speed of your site everywhere in the world.
Caching the 1st HTML request of your pages
Now let’s do a small test with e.g. the GT Metrix test tool by scanning from a server in Australia (you can choose the server location in the scanning options). Scan a page of your site once and then a second time to make sure that Cloudflare has cached your files on its Australian servers. If you go to the “Waterfall” tab, you should see something like this:
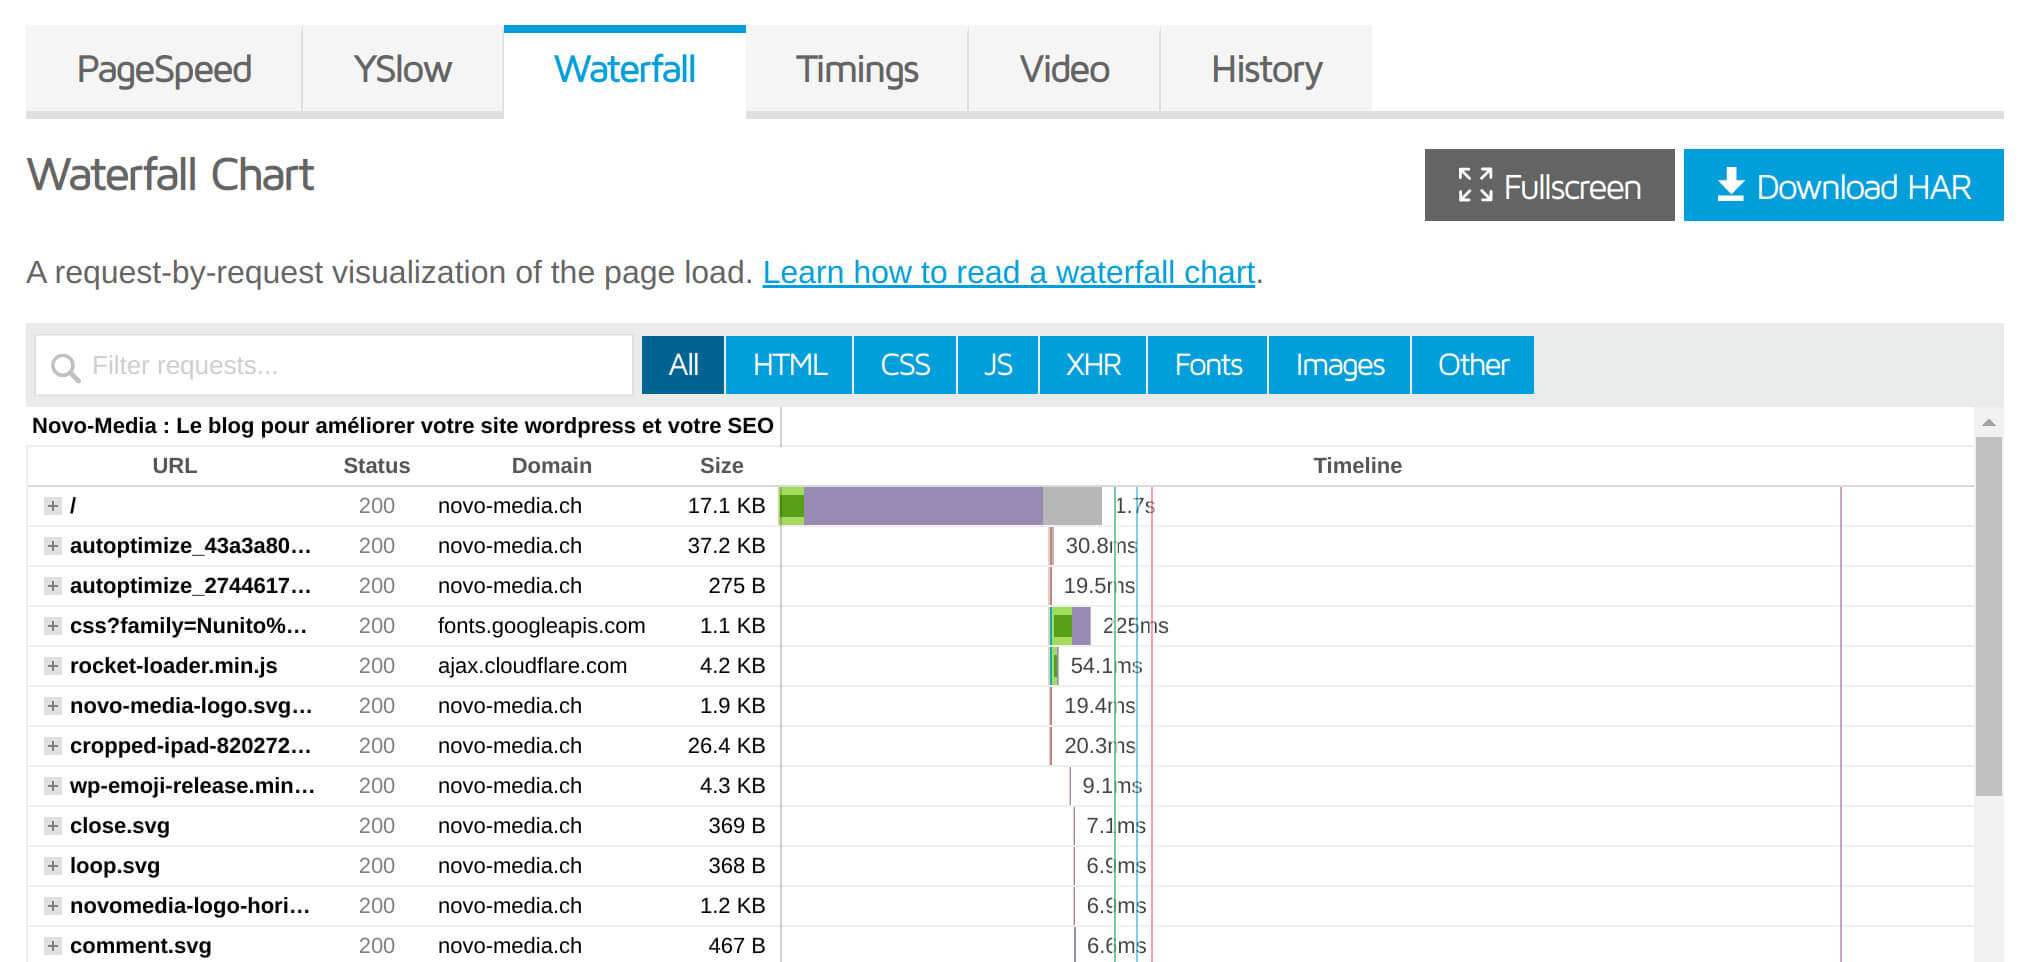
You will certainly notice that the loading of your files is super fast but that the 1st request that returns the HTML of your page is super slow, in this case 1.7s (I explain in detail the process of an HTTP request here). This is simply because the HTML of your pages is not yet cached on Cloudflare’s servers. So, when a user visits a page of the site, the first request will in this case make the trip to France to get the HTML of your page and come back to Australia… not really great, is it?
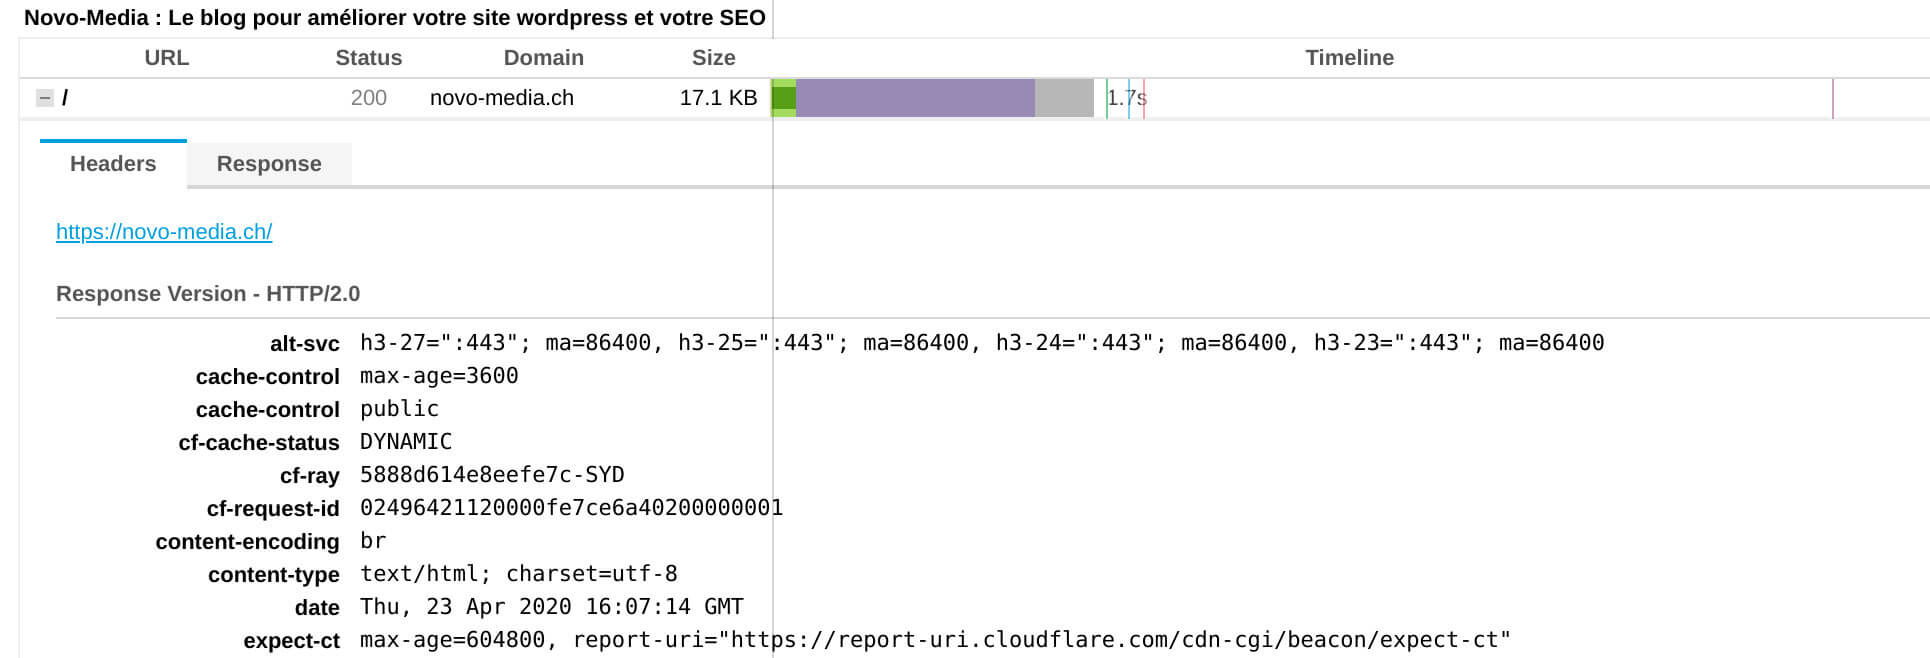
Moreover if you click on this first request, you will see that the header “cf-cache-status” is indicated DYNAMIC
the Page Rules menu that makes all the difference!
In order to successfully cache the HTML of your pages, we’ll have to configure the last Cloudflare menu we’re going to look at today: the “Page Rules”. These page rules allow you to control the behavior of Cloudflare on only certain pages of your site by defining some rules
With Cloudflare’s free account, you are allowed to set up 3 page rules. Let’s see together how to get the most out of these 3 rules to speed up your WordPress site as much as possible. Here are the 3 rules that you must define:
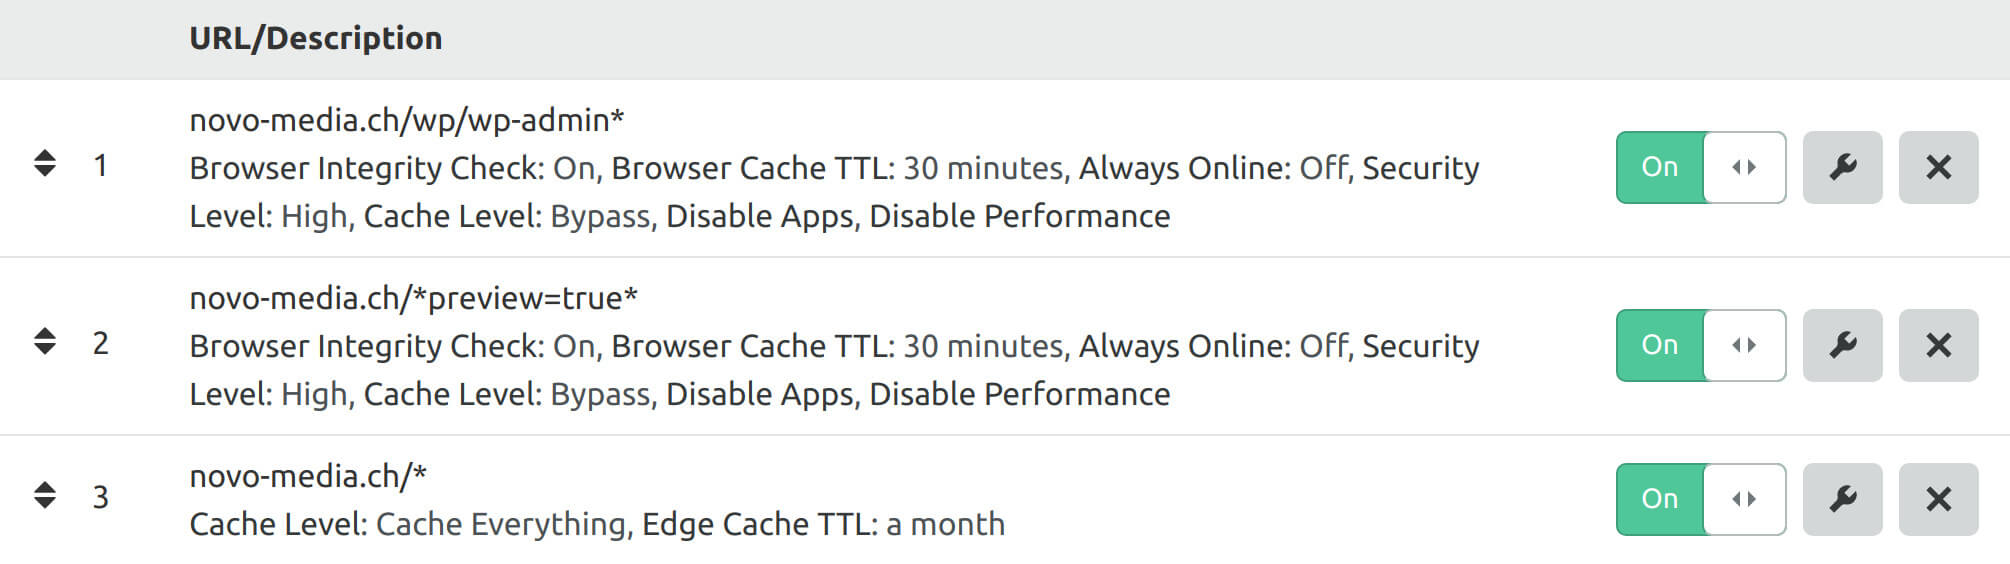
Note: The order of these page rules is important because only one of these rules will be triggered per page. The * sign allows you to target several urls with a single rule.
Let’s decompose together each of these rules:
The first one will tell Cloudflare not to cache all the admin of your site (Important note!!!! In your case, you probably don’t have the “/wp/” in the url. This is something that is specific to my installation):
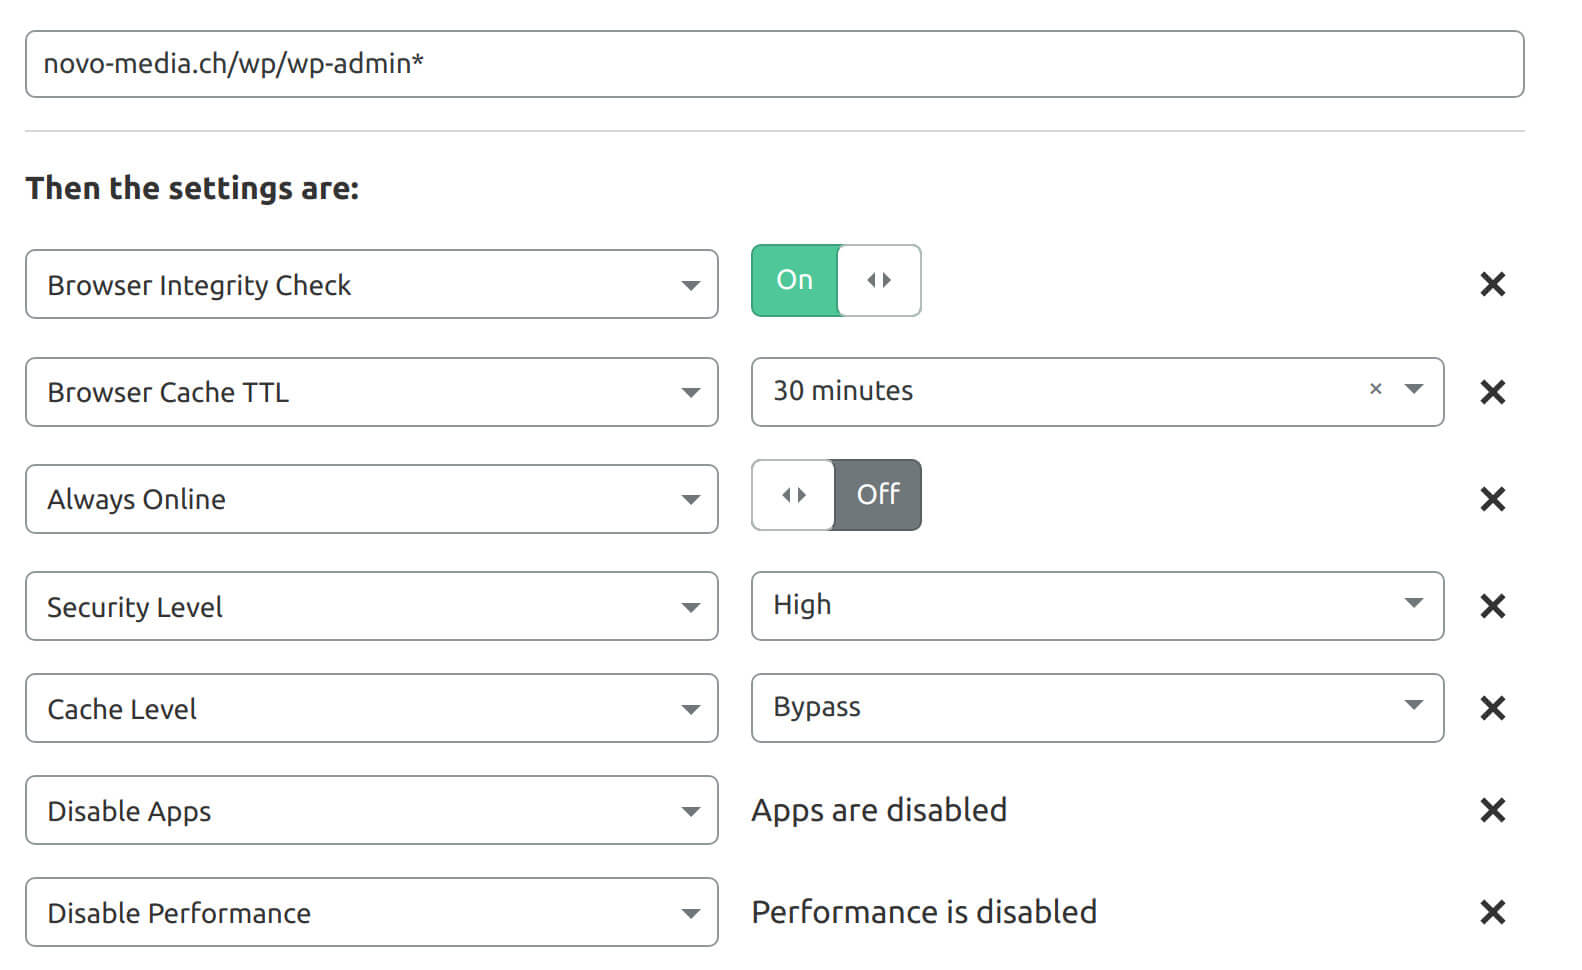
The most important thing above is to have set the “Cache Level” to “Bypass” to ensure that your admin pages are never cached by Cloudflare.
The 2nd page rule will tell Cloudflare not to cache all previews of your posts when you are writing them. To create this rule, simply use the same parameters as for the first rule, but target the urls structured as follows: novo-media.ch/*preview=true*.
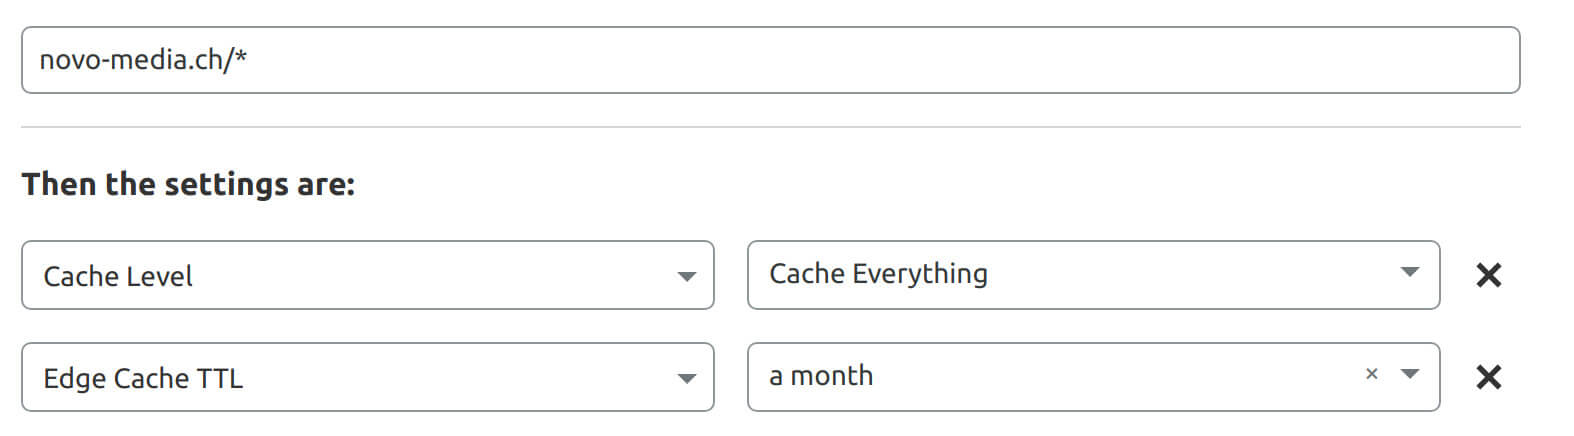
Finally, the last and most important rule will tell Cloudflare to cache all your pages (html, css, js, images) for one month, which happens to be the maximum duration offered by Cloudflare.
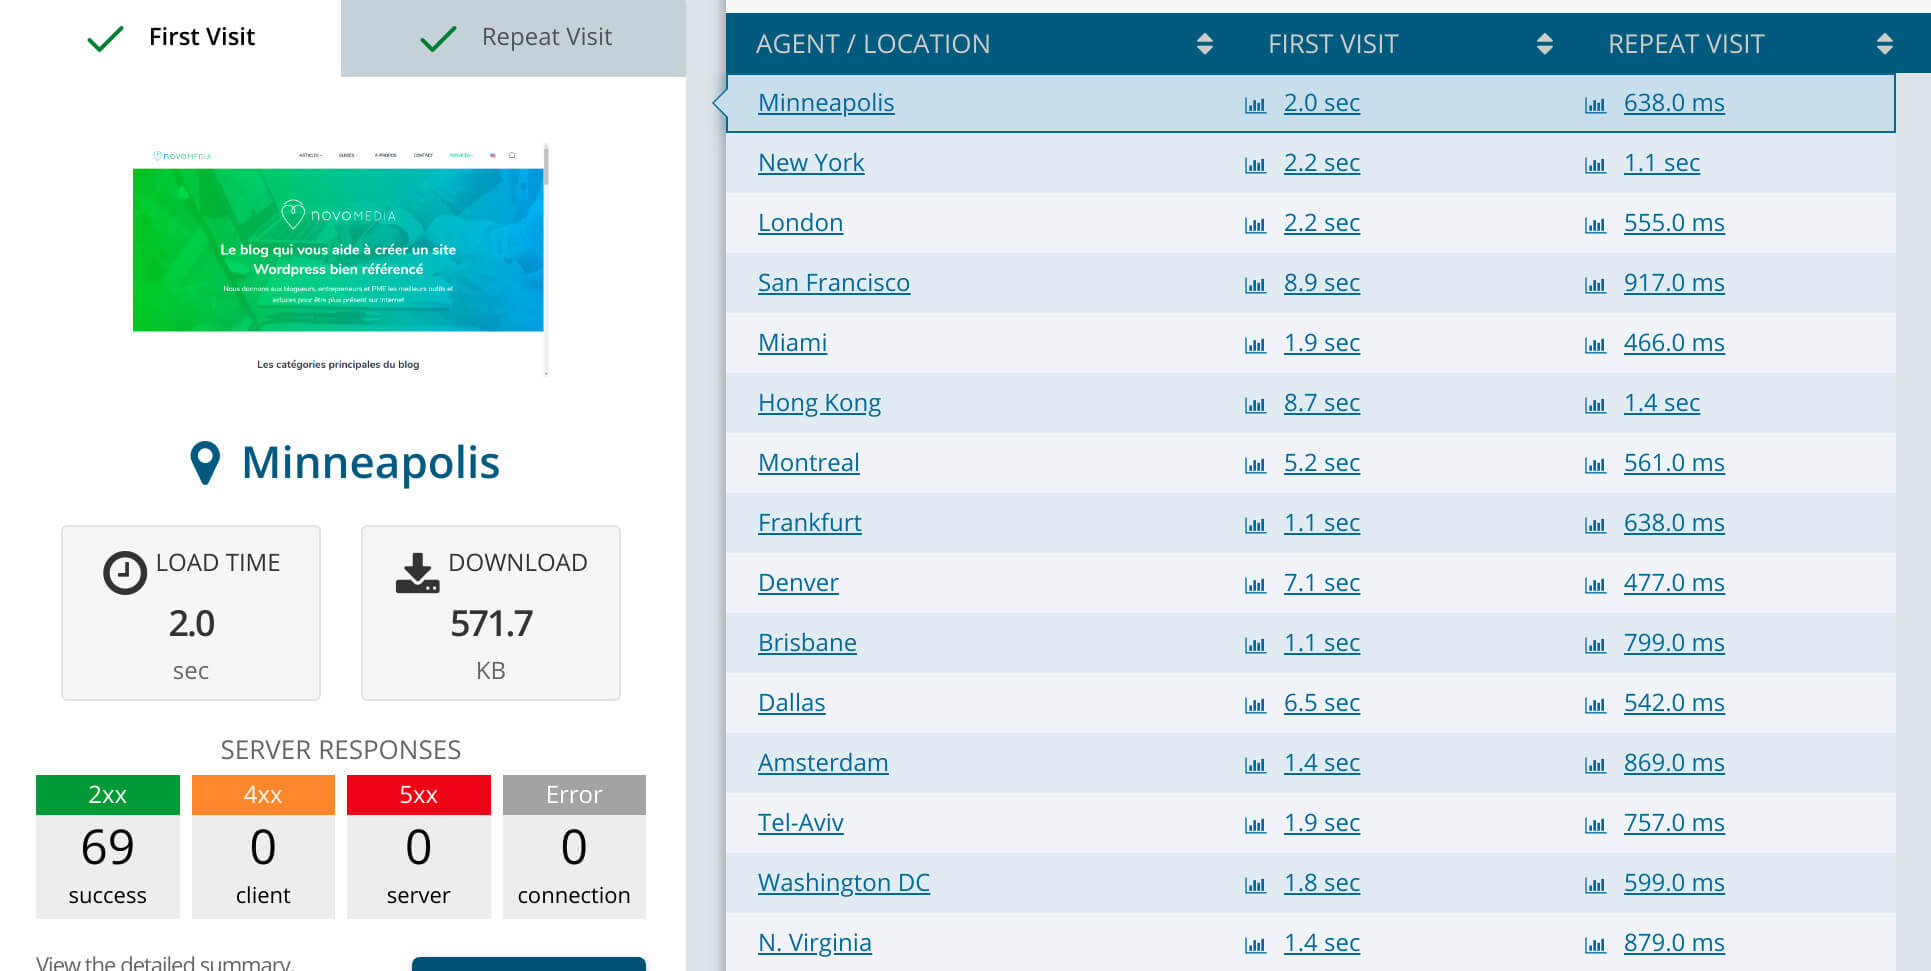
Once you’ve set up these 3 rules, if you retest the same page with gtmetrix, the speed of your 1 request should be much faster than before (and if you click on the 1st request, you’ll see that the status of the Cloudflare cache will be HIT) and your site should now have a similar loading speed all over the world . and it’s still free!!!
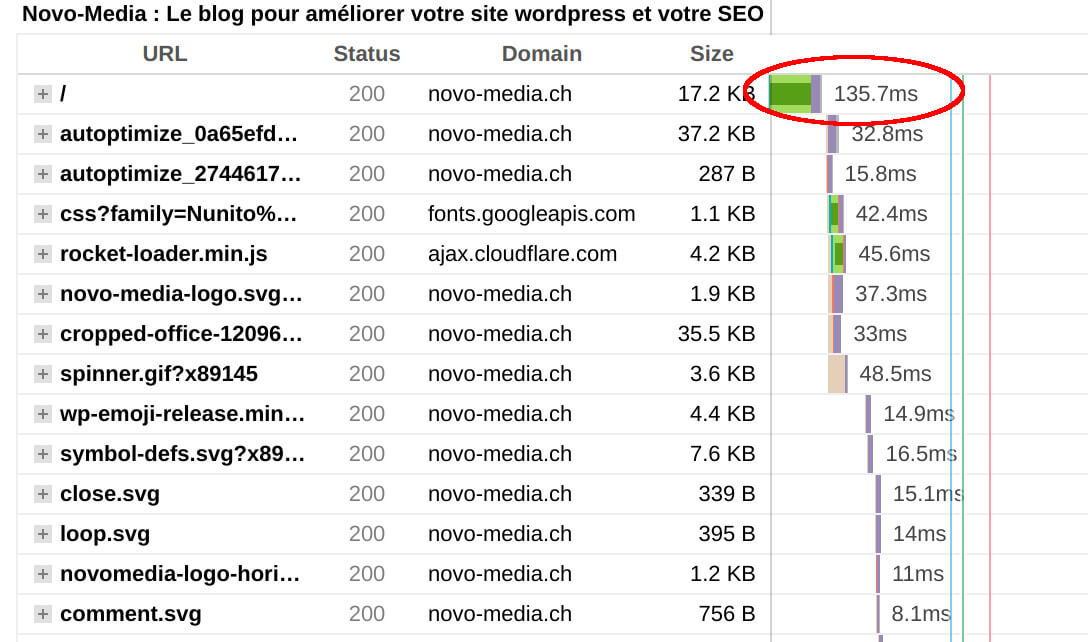
We could also redo the test of the 1st image of the article from several places in the world, and we can see that the site is much faster than before everywhere in the world!
Problems that may arise and how to deal with them
So it would obviously be too good if everything could work perfectly like that without any issue. However, there are a few things you’re going to have to pay attention to:
The admin toolbar of your site
When you are browsing your WordPress site and you are logged in, there is usually an admin toolbar that appears at the top of the page. The problem is that if you leave this admin menu enabled, it could be cached by Cloudflare and become visible to your visitors (even if they don’t have access to your admin, don’t worry). There are several ways to fix this problem:
- You can simply disable the toolbar in your WordPress administration user page (remove the check mark below)


- It seems that this plugin solves this problem completely but I haven’t had time to test it in detail yet (I’ll give you a feedback here as soon as it’s done)
Article Updates, Changes and New Comments
If you update an article, approve comments on your site, or make changes to your site, these changes will not be visible to your readers unless you clear the cache of the page in question from Cloudflare (unless you wait for the time set in the “Edge Cache TTL” parameter). There are several ways to do this:
- You can manually empty the cache of one, several or all pages of your site from Cloudflare’s admin menu.

- The plugin which I was telling you about before theoretically solves this problem by emptying the Cloudflare cache of the appropriate pages when you approve a comment or update an article. But as I told you, I still need to test this plugin in more details.
- The W3 total cache plugin has a Cloudflare extension that allows you to empty the CDN cache directly from your site’s WordPress administration. According to my tests, the cache of a post is automatically emptied when the post is modified or when a comment is approved on this post. That’s what I’m using at the moment (but I would probably need another article to explain the implementation of W3 Total Cache with Cloudflare).
The plugin that changes everything: WP CloudFlare super page cache
Update 2020: I quickly mentioned it above, but I finally had time to set up and test the WP Cloudflare super page cache plugin… and the least I can say is that this plugin is awesome since it fixes all the problems mentioned above!
Thanks to this plugin, you won’t need to manually configure the 3 Page Rules explained above. When you connect this plugin to your CloudFlare account, it will automatically create a single Page Rule and everything else is controlled directly from the plugin’s menus. WP Clouflare super page cache allows you to easily fix all the problems mentioned above:
- Bypass the cache when you are logged in your site admin
- Clears the Cloudflare cache when you update a post (clears only the Cloudflare cache of modified post)
- Option to clear the cache of a post or page when a comment is approved
- Compatible with many plugins like WP Rocket, Autoptimize etc…
- Even allows you to preload your pages into the CloudFlare cache for immediate caching
Honestly this plugin is almost magical and allows you to have all the advantages of CloudFlare paid plan (to have the same advantages without this plugin, it would cost you $200 per month of CloudFlare subscription) but keeping the free plan. In addition, the plugin developers are super available and answer all the questions they are asked on the forum (this is really amazing). I’ve now installed it on all my websites!
Note: Don’t forget to donate to the developers if you are happy with what the plugin brings you. As a plugin developer myself, I know how much time it takes to develop such a plugin and to answer users’ questions… In order to keep this kind of plugin free, it is important to properly compensate the developers for their work!
Download WP CloudFlare super page cache
Here I think I’ve explained everything you need to know to set up the Cloudflare CDN for free under WordPress. I know it’s not necessarily obvious for everyone but believe me, the gains in loading speed are spectacular and it’s really worth it. At the time of writing, I’ve only installed Cloudflare on novo-media but I’m about to do the same on our travel blog.
In any case if you have any questions or suggestions, feel free to leave them in the comment section below.
I found a lot of very good information on the website and the related facebook group WP Speed Matters.
Pin this article


Hi, first of all great review. I am a beginer about this, anway I am using cloudflare and for caching wp super cache. If I activate cloudflare page cache plugin, must I deactivate wp super cache plugin (or similar plugins like w3 total cache)?
Any other tip?
Best regards
Matej
Hi Matej,
If you use wp CF super page cache plugin with the options “FALLBACK PAGE CACHING” and “BROWSER CACHING” enabled, you probably don’t need any other caching plugin. But if these options don’t work for you for any reason, you can also keep using wp super cache or W3TC alongside the plugin.
Thx for reply Benoit,
I enabled FALLBACK PAGE CACHING” and BROWSER CACHING.
So, with these setings autoptimise is also not good to be used with CF super page cache plugin?
Currently I deactivated autoptimise, pls check link about testing speed:
If you have any tips let me know.
Best regards
Hey Matej,
Well your site is pretty well optimized now 😉 . Well you can still use autoptimise as this plugin is meant for assets optimization (if you don’t optimize assets directly in CF) and it has nothing to do with page caching.
Hi and thanks for reply.
I also made another site and I optimised all in same way, including just autoptimise and clodflare page cache-with same settings, also on cloudflare.
But website is not so fast.
Can you tell me your point of view, any tip?
Best regards
Hey Matej,
Well it’s quite fast already… the one thing I would change is load less fonts (your are loading 12 fonts at the moment). You probable only need 2-4 fonts max
Hey Benoit,
I am actually using Cloudflare’s free version of CDN and I think it pretty much does a great job. The website is much faster and I don’t have to worry about the security anymore.
Cloudflare does it all.
Thanks for your post.
You’re welcome! Yeah Cloudflare is really awesome and they really offer a lot of stuff for free. It’s pretty amazing when you think about it!