
As I told you in my previous blog post, I have finally switched to the new WP text editor also known as Gutenberg. This editor is clearly the future of WordPress (whether you like it or not) and will soon be more than just a text editor. For example, what you still know as Widgets will soon be replaced by Gutenberg blocks… and that’s just the beginning!
Since Gutenberg is here to last, we might as well get used to it as soon as possible and make our lives a little easier. So today I’m going to show you how you can create custom Gutenberg blocks quite easily, for example to create Info boxes, a table of contents or any other item you might need regularly in your posts.
Why create custom Gutenberg blocks?
I already see you coming! Maybe you will tell me:
But there are already a lot of block plugins for Gutenberg!
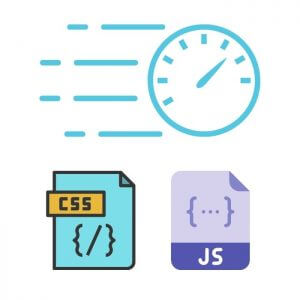
And it’s true! There are now a lot of plugins that add blocks to Gutenberg (like FAQ, buttons, table of contents, info box, price tables etc…). The main problem with these plugins is that in general you might only use 10% of the extra blocks these plugins provide. This means that you will add unnecessary CSS and JS complexity on all your pages which will slow down the loading speed of your site.
So for me the main reasons to create custom Gutenberg blocks are the following:
- To add only the blocks you really need and avoid overloading your site with unnecessary CSS and JS.
- To create blocks that fit exactly to your needs.
- If you are a developer, this allows you to create custom elements that can be easily used by your customers.
The different ways to create custom Gutenberg blocks
If you don’t mind, let’s go right to the point because there are different ways to create custom blocks:
- Code your own plugin with the Block API to create your custom block. This is obviously the most complicated way because it requires a good knowledge of JS and react.js. Personally I choose this option only if the block I create could be used by a lot of people (so a plugin that I would release in the WordPress directory) or to extend the functionalities of existing blocks in Gutenberg. By the way, I’m still by far not an expert and it’s not so easy to start when you have little experience in Javascript. But I might come back to this topic in a future article but if you are curious, you can have a look at this tutorial.
- Use a plugin that facilitates the process of creating blocks (also called block builder). Since many WordPress developers are not experts in Javascript (since WordPress is built in PHP, it’s often the most familiar language among WP developers), a number of plugins have been developed to facilitate the creation of blocks without the need to code in Javascript. These solutions are ideal if you need to create custom blocks for your personal use on your site or for a client’s theme.
As you will have understood, in this article we will focus on the second solution that will allow us to create custom blocks easily (practically without having to write a single line of code).
Plugins to create custom Gutenberg blocks
To my knowledge, there are 3 plugins that allow you to create custom blocks for Gutenberg easily:

- Advanced Custom Fields: It is one of the most popular plugins for WordPress (more than a million installs). Originally, it allows people to add custom fields everywhere on their site and the premium version also allows you to create custom Gutenberg blocks.
- Genesis Custom Blocks (formerly Block lab): Block lab was the first plugin to tackle this problem and has since been bought by WP Engine and renamed Genesis Custom blocks. Most of the plugin’s features are still free but some have been restricted to Genesis pro users.
- Lazy blocks: This plugin is the last block builder still completely free and allows you to do everything the 2 plugins mentioned above do in their paid version. That’s why I chose to test this one first (and you’ll see, to test it is to adopt it).
So below we’re going to look at the Lazy blocks plugin and first I’m going to show you how to create a simple block like an Infobox that you could use in your posts. Then I will show you how to create a more complex block to automatically create a table of contents based on the titles of your article or page.
Create an Infobox block with the Lazy blocks plugin
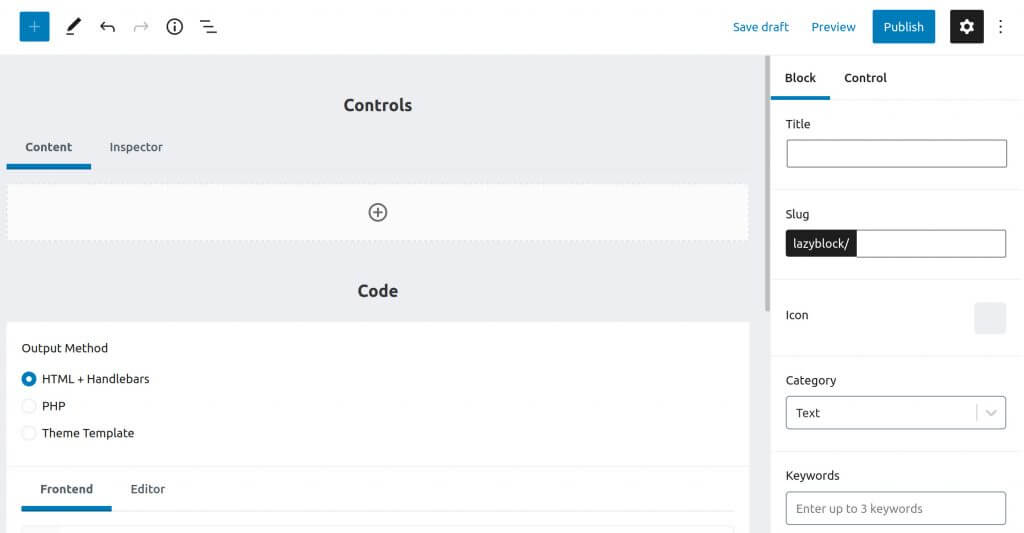
To start you obviously need to install the Lazy blocks plugin. Once activated, click in the left menu on Lazy blocks -> add new to start creating your first block. You will then arrive on the following page:
Note: the documentation of the Lazy blocks plugin is well done and very comprehensive. I’ll send you regularly on some page of the doc
There 3 main menus:
- The “Controls”: Controllers are all the elements you can add to your block. You could add a text box for the title or description, an image, a button and many other things. You will see that with all the controllers at your disposal, you will be limited only by your imagination when creating your blocks. You can find the list of all available controllers here
- The “Code”: This is where you will be able to define the HTML code that will be displayed by the controllers in your articles and/or the text editor. There are 3 ways to define the display of the code (HTML+handlebars, PHP or directly write the code in your theme) but I’ll explain all this below.
- Settings of the block or controllers: In the menu on the right, you can define the title of your block, its description, its icon, where it will be displayed in the Gutenberg menu… If you select a controller, you can also define its different attributes in the right menu.
Now that you understand the basics, let’s go back to the example of our infobox. In this box we would like to be able to add a title if desired and content that needs to be flexible (paragraph, images, lists, buttons etc…). So we will define the following controllers:
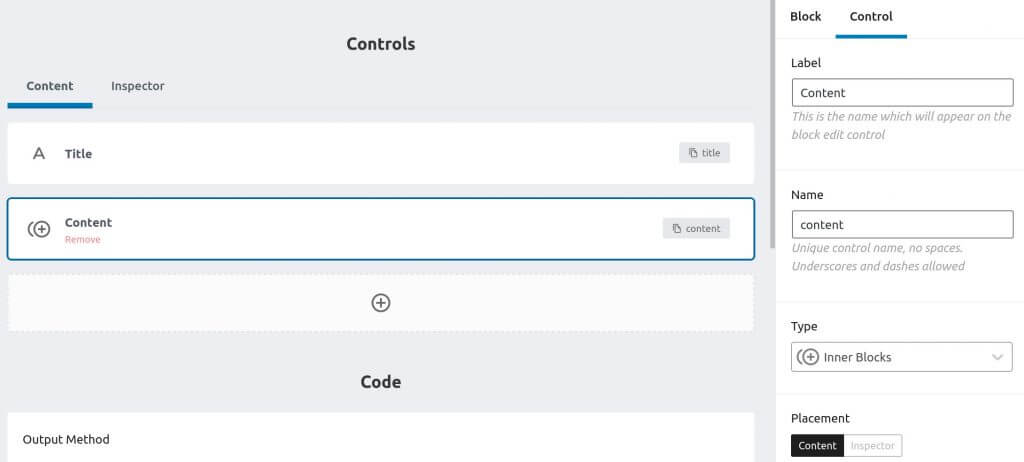
- a “title” controller: A simple text “type” controller to be able to define the title of the infobox. Note that the “Name” attribute of the controller is important since it is the one that will be used afterwards in the code part.
- a “content” controller: For this controller we will choose the very convenient “type” “Inner Blocks”. It allows us to add any kind of Gutenberg block inside our Infobox. This will allow us to easily add text, image, buttons and so on…
Now that we have defined our controllers, let’s move on to the slightly more complicated part of the Code that will allow us to display our infobox in our article and/or the text editor. As I said before, Lazy Blocks gives us three ways to display the code of our block (the first two by writing the code directly in lazy blocks and the last one by modifying our theme files):
HTML + Handlebars: Handlebars is a templating language that makes it easy to write HTML templates. Simply put, it allows you to easily add variables in HTML code. Don’t worry, you’ll quickly understand with the example of our Infobox:
<div class="infobox">
    {{#if title}}
        <div class="infobox-title">{{title}}</div>
    {{/if}}
    {{{content}}}
</div>
You will certainly have understood by reading these few lines of code above, just add the “Name” attribute of your controller between 2 {{ }} to display the values you will have defined in your Infobox. So here we insert a title in a <div class="infobox"> </div> only if it’s defined (thet’s why there is a {{#if title}}) and the content
PHP: Even if the syntax is less elegant than with Handlebars, you can write your infobox code directly in PHP. For the example of our Infobox it would look like this:
<div class="infobox">
    <?php
    if(!empty($attributes['title'])) {
    ?>
        <div class="infobox-title">
            <?php echo esc_html( $attributes['title'] ); ?>
        </div>
    <?php
    }
    ?>
    <?php echo $attributes['content']; ?>
</div>
So you can see that in PHP the syntax is a bit more verbose and that the infobox values are contained in the $attributes variable so for the title you’ll have to display $attributes['title'] and for the content $attributes['content'].
Theme Template: Finally you can add this code directly in your theme. When you choose this option, Lazy blocks shows you a folder where you have to create a file block.php which contains the code of your block which is exactly the same as for the PHP option. This is the method I use for all the themes of the sites I develop because I prefer to have the code of the blocks directly in the theme instead of saving it in the database (more info about this method here). So here is my block.php file:
<?php
/**
 * Infobox block
 *
 * @var  array  $attributes Block attributes.
 * @var  array  $block Block data.
 * @var  string $context Preview context [editor,frontend].
 */
?>
<div class="infobox">
    <?php
    if(!empty($attributes['title'])) {
    ?>
        <div class="infobox-title">
            <?php echo esc_html( $attributes['title'] ); ?>
        </div>
    <?php
    }
    ?>
    <?php echo $attributes['content']; ?>
</div>
So once you have chosen one of these 3 methods, edit an existing item or create a new item and add a block. You should see your new Infobox block with the icon you defined, where you defined it in the Gutenberg menu.
We will add the Infobox block to our article. Under “Title” you can enter the title of your Infobox and under “Content” you can insert any block you want, for example below an image, 2 paragraphs and 1 link:
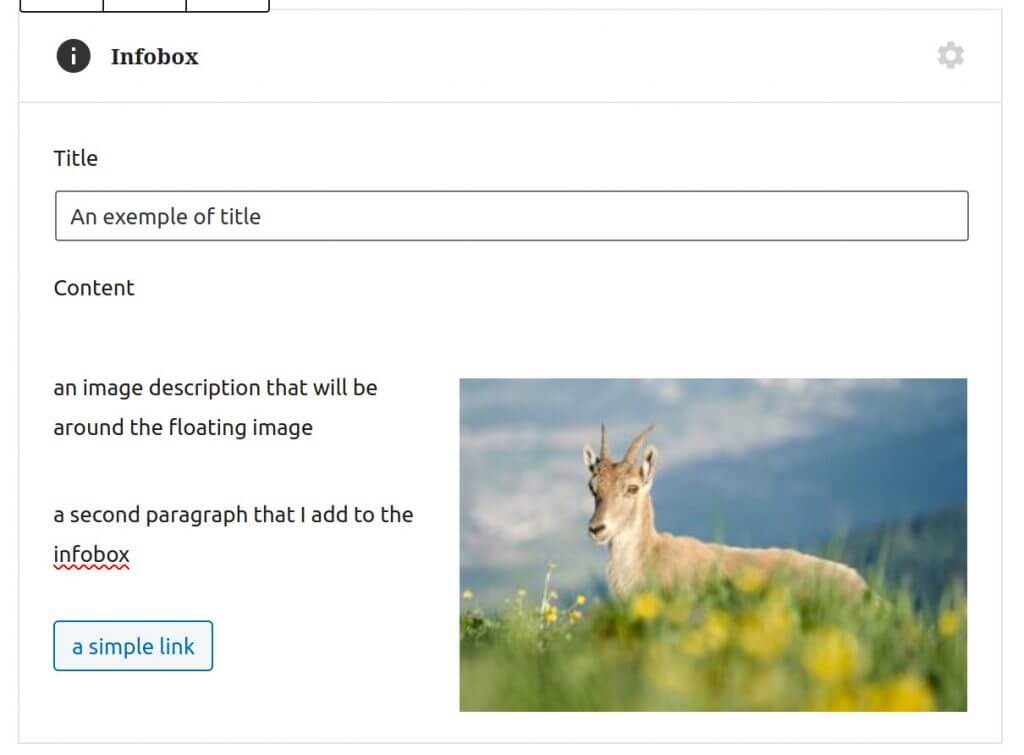
And here is what it looks like on Novo-media:

an image description that will be around the floating image
a second paragraph that I add to the infobox
The HTML code generated by our custom block is the following as defined in our code:
<div class="infobox">
    <div class="infobox-title">An exemple of title</div>
    <div class="wp-block-image">
        <figure class="alignright size-medium">
            <img src="https://novo-media.ch/app/uploads/2020/05/ewww-premium-plus-png-image-compression-300x197.jpg" alt="" class="wp-image-4369 ls-is-cached lazyloaded" srcset="https://novo-media.ch/app/uploads/2020/05/ewww-premium-plus-png-image-compression-300x197.jpg 300w, https://novo-media.ch/app/uploads/2020/05/ewww-premium-plus-png-image-compression-1024x672.jpg 1024w, https://novo-media.ch/app/uploads/2020/05/ewww-premium-plus-png-image-compression-768x504.jpg 768w, https://novo-media.ch/app/uploads/2020/05/ewww-premium-plus-png-image-compression-1536x1008.jpg 1536w, https://novo-media.ch/app/uploads/2020/05/ewww-premium-plus-png-image-compression.jpg 1600w" sizes="(min-width: 600px) 30vw, 100vw" width="300" height="197">
        </figure>
    </div>
    <p>an image description that will be around the floating image</p>
    <p>a second paragraph that I add to the infobox</p>
    <p><a href="https://novo-media.ch/" class="button gradient">A simple link</a></p>
</div>
Some additional comments
Editor display: You can also control the code that is displayed in the Gutenberg editor. Personally, I prefer not to bother with that and I always set “Never” under “Show block preview in editor”. But maybe you’d want to be a bit more perfectionist than I am if you’re developing a theme for a client. If that’s the case, you can simply choose “Always” and define the code that should be displayed in Gutenberg under “Editor”. If you use the “Theme template” method, you can simply create in addition to block.php another editor.php file.
The CSS style of the infobox: Obviously it is not enough to create the HTML of the Infobox, it is also a question of giving it a style with a little CSS. If you know how to modify the CSS of your theme, you can directly add a few lines of code in the style.css file of the theme. Otherwise in general under the menu appearance->customize there is a menu at the bottom to add custom CSS without changing the theme of your site. Here are for example some CSS rules you could add:
.infobox {
  background-color: #000;
  padding: 20px;
  margin-top: 10px;
  margin-bottom: 10px;
}

.infobox .infobox-title {
  text-align: center;
  padding: 10px;
  font-size: 25px;
  font-weight: bold;
}
You could obviously add more CSS to get exactly the result you want.
Create a Table of Contents block with the Lazy blocks plugin
Now that you see how to create simple blocks to customize the design of your articles, I will show you a more advanced example. We’re going to code a Table of Contents block that will automatically create a table of contents based on your titles.
Note: I won’t go into details about how the Lazy blocks plugin works this time. I assume that you have understood the controllers, the code and the settings.
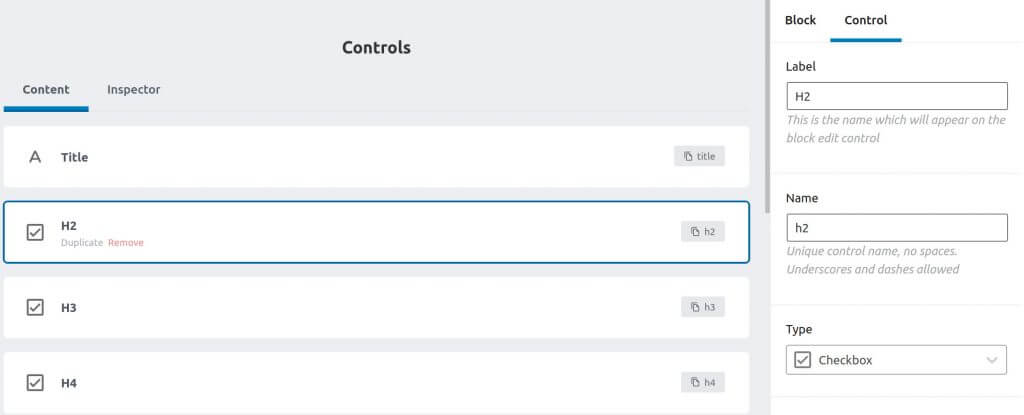
Contols: For this table of contents block we will need 4 controllers (1 text to define the title of the table of contents and 3 checkboxes to choose which levels of titles we would like to see appear in the table of contents). Here’s what it looks like:
Code: For this more complicated block, you will have to use the “Theme template” or “PHP” method because there is more code to write this time. Here is the code of my block.php file:
<?php
/**
 * Table of content block
 *
 * @var  array  $attributes Block attributes.
 * @var  array  $block Block data.
 * @var  string $context Preview context [editor,frontend].
 */

$headings = ['h2'=>$attributes['h2'], 'h3'=>$attributes['h3'], 'h4'=>$attributes['h4']];

$allowed_headings = [];

//fill the allowed headings array based on the checkboxes
foreach ( $headings as $key => $value ) {
    if($value) {
        $allowed_headings[]=$key;
    }
}

//display the table of content
?>

<div class="toc">
    <div class="toc-title"><?php echo esc_html( $attributes['title'] ); ?></div>
    <?php echo novomedia_table_of_contents($allowed_headings); ?>
</div>

<?php
//update ids of title tags
add_filter(
    'the_content',
    function( $content ) use ( $allowed_headings ) {
        return novomedia_update_title_ids( $content, $allowed_headings );
    },
    10
);
?>
The functioning is not so complicated. First we look at which levels of titles should be included in the table of contents according to the 3 checkboxes (by putting them in the array $allowed_headings).
Then we display the table of contents, with the title and then its content which is created by the function novomedia_table_of_contents() (I’ll come back to this function right away).
And finally we still have to make sure to add ids (or anchors) to H2, H3 or H4 titles if these ids are not already defined. This is done here by the function novomedia_update_title_ids() which is called by the filter 'the_content'.
Let’s now detail the function that creates the list based on titles to display the table of contents:
function novomedia_table_of_contents($allowed_headings) {
    global $post;
    $toc = '';
    $hcount = 0;

    $dom = new DOMDocument();
    $dom->loadHTML( mb_convert_encoding( $post->post_content, 'HTML-ENTITIES', 'UTF-8' ) );
    $elements = $dom->getElementsByTagName('*');
    foreach($elements as $child){
        if(in_array($child->nodeName, $allowed_headings) ) {
            $hcount = $hcount + 1;

            // create nested list with table of content
            // set levels
            if ($child->nodeName == 'h2') {
                $level = 1;
            }
            elseif ($child->nodeName == 'h3') {
                $level = 2;
            }
            elseif ($child->nodeName == 'h4') {
                $level = 3;
            }

            //if the id is not set, use title slug
            $title_id = $child->getAttribute('id');
            if(empty($title_id)){
                $slug = sanitize_title($child->nodeValue);
                $title_id = $slug
                ;
            }

            // open the list
            if($hcount == 1) {
                $toc .= '<ol><li>';
                if($child->nodeName == 'h2') {
                    $toc .= '<a href="#'.$title_id.'">'.$child->nodeValue.'</a>';
                    $current_level = $level;
                }
            }
            else {
                if($level - $current_level == 0) {
                    $toc .= '</li><li><a href="#'.$title_id.'">'.$child->nodeValue.'</a>';
                    $current_level = $level;
                }
                elseif($level - $current_level == 1) {
                    $toc .= '<ol><li><a href="#'.$title_id.'">'.$child->nodeValue.'</a>';
                    $current_level = $level;
                }
                elseif($level - $current_level == -1) {
                    $toc .= '</li></ol><li><a href="#'.$title_id.'">'.$child->nodeValue.'</a>';
                    $current_level = $level;
                }
            }
        }
    }
    if(!empty($toc)){
        $toc .= '</ol>';
    }

    return $toc;
}
This function will create a nested list containing links towards the titles to be included in the table of contents (H2, H3 and/or H4). If the titles do not have a defined id, the slug of the title is chosen as an anchor.
We then have to update the title anchors in the content of the article using the 2nd function called by the filter 'the_content':
function novomedia_update_title_ids($content, $allowed_headings) {

    $dom = new DOMDocument();
    $dom->loadHTML( mb_convert_encoding( $content, 'HTML-ENTITIES', 'UTF-8' ) );
    $elements = $dom->getElementsByTagName('*');
    foreach($elements as $child){
        if(in_array($child->nodeName, $allowed_headings) ) {
            // if id is empty, set it to title slug
            if(empty($child->getAttribute('id'))){
                $slug = sanitize_title($child->nodeValue);
                $child->setAttribute('id', $slug);
            }
        }
    }
    return $dom->saveHTML();
}
Nothing very complicated here. We filter in the content of the article all titles that need to be added to the table of contents. If the id (or anchor) of the title is not defined, it is set with the title slug.
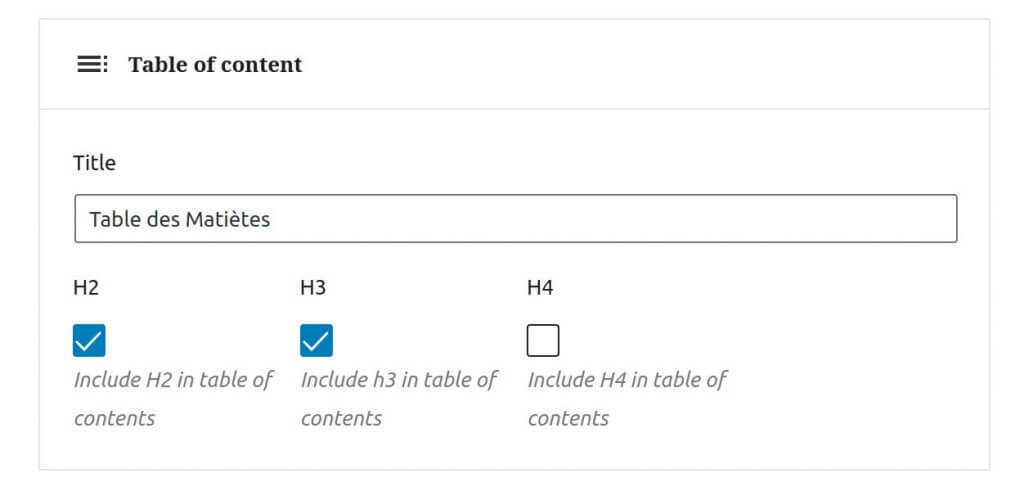
Once you’ve done all that, you’ll have a new “table of content” block available in Gutenberg. All you have to do is define the title of the table of contents and the title levels you want to include and the table of contents will be created automatically. In fact, it is with this block that the table of contents at the beginning of the article has been created.
That’s all for today. Now you know how to create custom blocks with the Lazy blocks plugin. I hope the examples I gave you will help you to create your first blocks and to imagine the kind of blocks you could create for your site.
And as usual, if you have any questions, feel free to leave a comment below. I will be happy to answer you!


Hello,
Do you know if there is a way to see the custom made Block rendered and styled while you are editing a Page or Post, or do you have to click Preview to see the Block rendered?
Genesis Custom Blocks displays the Block rendered and styled, but I had trouble getting it to work with transform on elements with inline CSS, so I am trying Lazy Blocks now.